The dreary weather seems to have passed and there has been 2 wonderful days of sunshine and pleasant summer temps – enough to have caused me to sneak out of the house (despite any number of tasks that were calling my name!) and spend sometime in the garden. However, I must admit that even as I pull weeds, trim and plant, or work the dirt, I find myself thinking about any number of quilting and felting projects. Perhaps this is my way of multi-tasking!! The ideas really don’t seem to stop – guess this is better than the alternative of not having any inspiration at all.
To add to the mix, I spent the past two mornings at Eagle Creek Quilt Shop as a guest presenter at their monthly breakfast club. As I have shared before, Lori and Becky have been supportive of my pattern designs. I had an opportunity to enjoy a light breakfast and conversation with the club members, and then presented and shared my pattern samples. The ladies were very attentive and quite complimentary, asking great questions. I hope I inspired them to take a try at a wool felt/felted wool project!
Once again, Eagle Creek has a great selection of National Non-Wovenwool felt in both the 20% wool and 35% wool (both mixed with acrylic). One great question asked was about the difference between wool felt vs. felted wool fabric. Felted wool is generally a woven fabric yardage that is felted by washing in hot/warm water and drying, causing the fibers to felt and the fabric to shrink. Wool fabrics can vary quite a bit in their rate and type of shrinkage. Wool felt is a type of needle punched. ‘compressed’ wool fibers fabric and is not woven. Bolt instructions do not recommend washing – however, you will find in my patterns that I generally machine wash my wool felt in cool or warm water, on a gentle cycle, and then dry it in a dryer on a ‘light’ or air setting – for as little time as it takes to get dry. I then use a steam iron to press and block the wool. It will have shrunk – most likely about 4-6 ” – but this can vary a bit from piece to piece. Keep that in mind. The washing makes the wool thicker and gives it a ‘softer’ surface. I combine both types of wool in my patterns as it provides me a larger ‘palette’ of colors and textures.
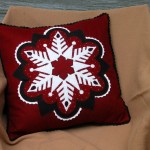
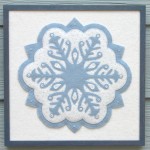
While I brought along my finished samples of the pattern designs, I had previously been thinking about those who might enjoy the pattern designs, but not necessarily want only table decor. As usual, in my desire to inspire, I envisioned using these patterns as pillow designs, or framed wall pieces. For that matter, I can say that I had several other ideas and they will most likely emerge somewhere in the future! Meanwhile, I chose to create two new snowflake designs (sorry, these are not yet published as patterns) and made them up as a pillow and a framed wall piece. I wanted to share these with you before I start the tutorials explaining the construction of the Fall Leaves pattern that I cut out last Saturday!
Despite my best efforts, the photograph of the blue snowflake doesn’t quite do justice to the fact that I embellished it with sewn on Swarovski crystals which really added a beautiful sparkle. I also decided to get even a bit more creative and experimented by adding a pale blue and silver superfine scrapbooking quality glitter to the white felt background. (I didn’t think that the ‘fuzzy’ wool felt surface would take too kindly to any of those glitter glues that are out there. I have found many of them to result in a stiff and/or sticky kind of surface.) So… I fused the white felt background (just the background!) to a sheet of foam core with heat’n’bond – this worked wonderfully. I then rubbed in a generous amount of the fine glitter, turned the piece upside down and tapped out the excess. I had the good sense to do this outdoors as there was a considerable amount of excess. However, because of the fine nature of the glitter, enough ‘stuck’ to create a very subtle and pretty effect. I’m not totally convinced on the permanence of the ‘loose’ glitter approach, but I also think that there is no way you could ever remove it all from the wool felt fiber either! I also don’t think it would work very well on felted wool. Guess that is what experiments are all about! To mount the snowflake topper, I used a long, fairly thin, strong needle (along with embroidery thread to match) and simply stitched through the foam core and gently tacked the snowflake at various points around the perimeter. This worked extremely well, seems to support the piece, and is virtually invisible. Plus, if I ever choose to want to use the snowflake as a topper, I can easily clip the tacks and remove the piece from the frame!


Have you ever considered selling patterns to your beaded flower pins? They are absolutely gorgeous. I’m sure they’d be a big hit. Just a thought….love your wool applique patterns!
Thanks for your comments Beth! I am hoping to have some flower pin patterns ready by next spring. I am still in the ‘development’ stage – trying various options and techniques, as well as considering just how I want to design/write the pattern(s). I’m glad you enjoy them: I know they were an unexpected hit at the last trunk show I did, so much so that customers were asking for a ‘pin’ class as well as a topper class! I’ve tentatively agreed to teach such a class…so I guess the pressure is on to be sure I get some patterns done!!! Be sure to check back early next year for my progress! You could also like DesignAndBeMary on facebook; since I post reference to my blog articles, you would then get notice of any new posts. Happy stitching!
Mary, got your email about your red, black and white snowflake pillow. I will wait to get it and hopefully you will hear from the magazine people soon. I understand what you are talking about with all that it takes to get the pattern out there. Keep up the great designs I love them all , started my collection of your patterns. Thank you, Mary
Thanks for your kind comments. It is very important to me that those who purchase my patterns not only enjoy the designs but will also enjoy making them! I try to create new designs that I would make for my own family and friends, so it’s always nice to hear others like them as well. Enjoy stitching your ‘Candles’ and stay tuned for the pillow pattern down the road!