
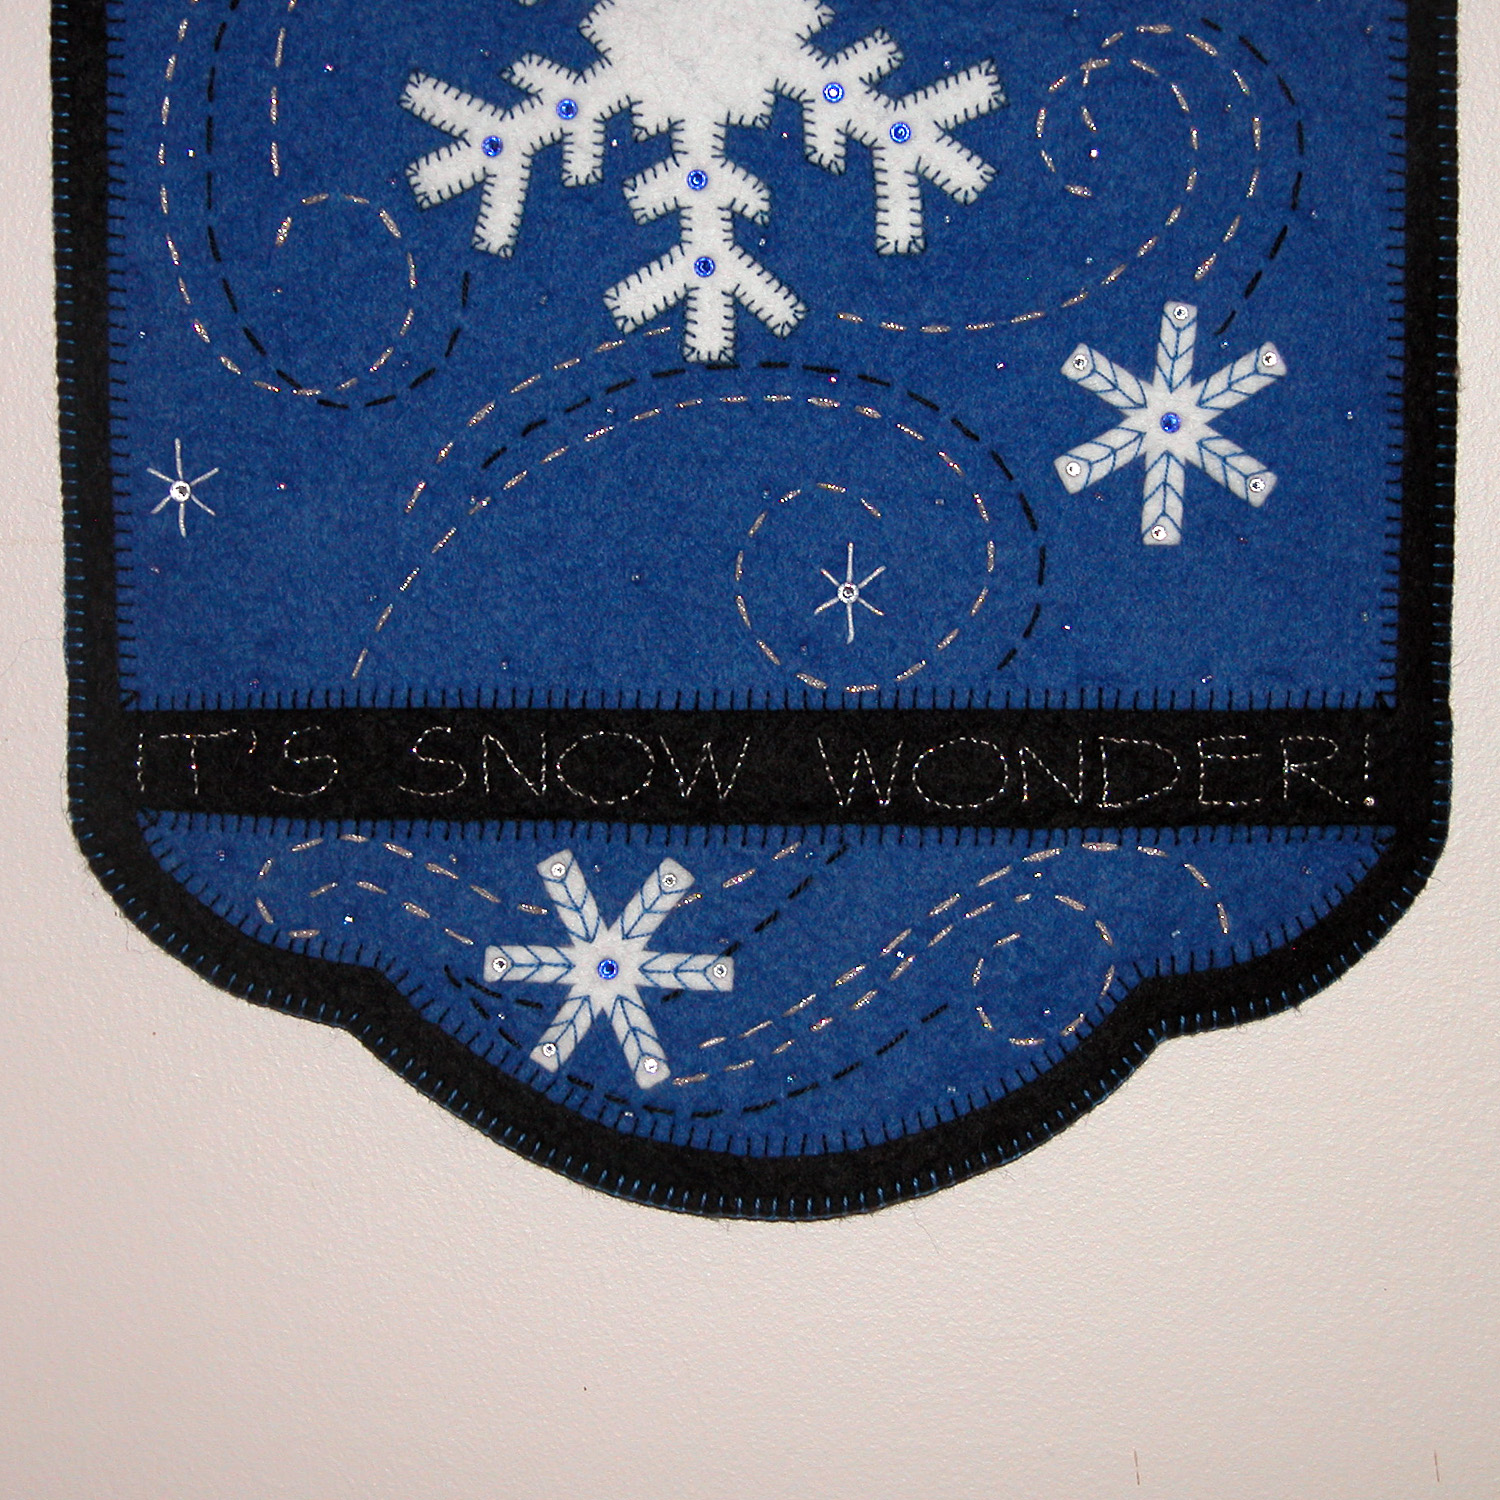
 I guess if you are reading this, I can assume you are not easily frightened away by things involving winter weather! I make no apologies. I happen to be one of those persons who loves snow. I realize it’s no fun to drive in and for sure it can test one’s fitness level (ummm ‘age’?) when clearing it from the driveway or sidewalk! But I’m a hopeless romantic and love to watch snow fall in the evening hours, twinkle in the morning sunshine, and lay like a pristine sparkling carpet when I walk, ski, or snowshoe in the nearby park/woods. I created my wall hanging “It’s Snow Wonder” to capture the swirling and sparkling of snowflakes. As promised in my last post, I have put together this tutorial about many of the ways one can mark felted wool and wool felt; the letters on this wall hanging will help demonstrate at least one way to mark your project!
For anyone who has worked with wool/wool felt – from beginners on up – the million dollar question is always ‘how can I mark my wool’??? Well, the long and short of it is, there is no one surefire way. However there are lots of possibilities and experimenting and trying as many as possible will arm you with an array of ‘tools’ to use in any given project. Sometimes what works for one project, will not work for another, especially if you like to mix it up and use a variety of materials. Keep in mind that the fuzzier the fabric, it will take a bit more ‘coaxing’ to successfully mark it. The following items/methods are all things that I have used quite successfully.
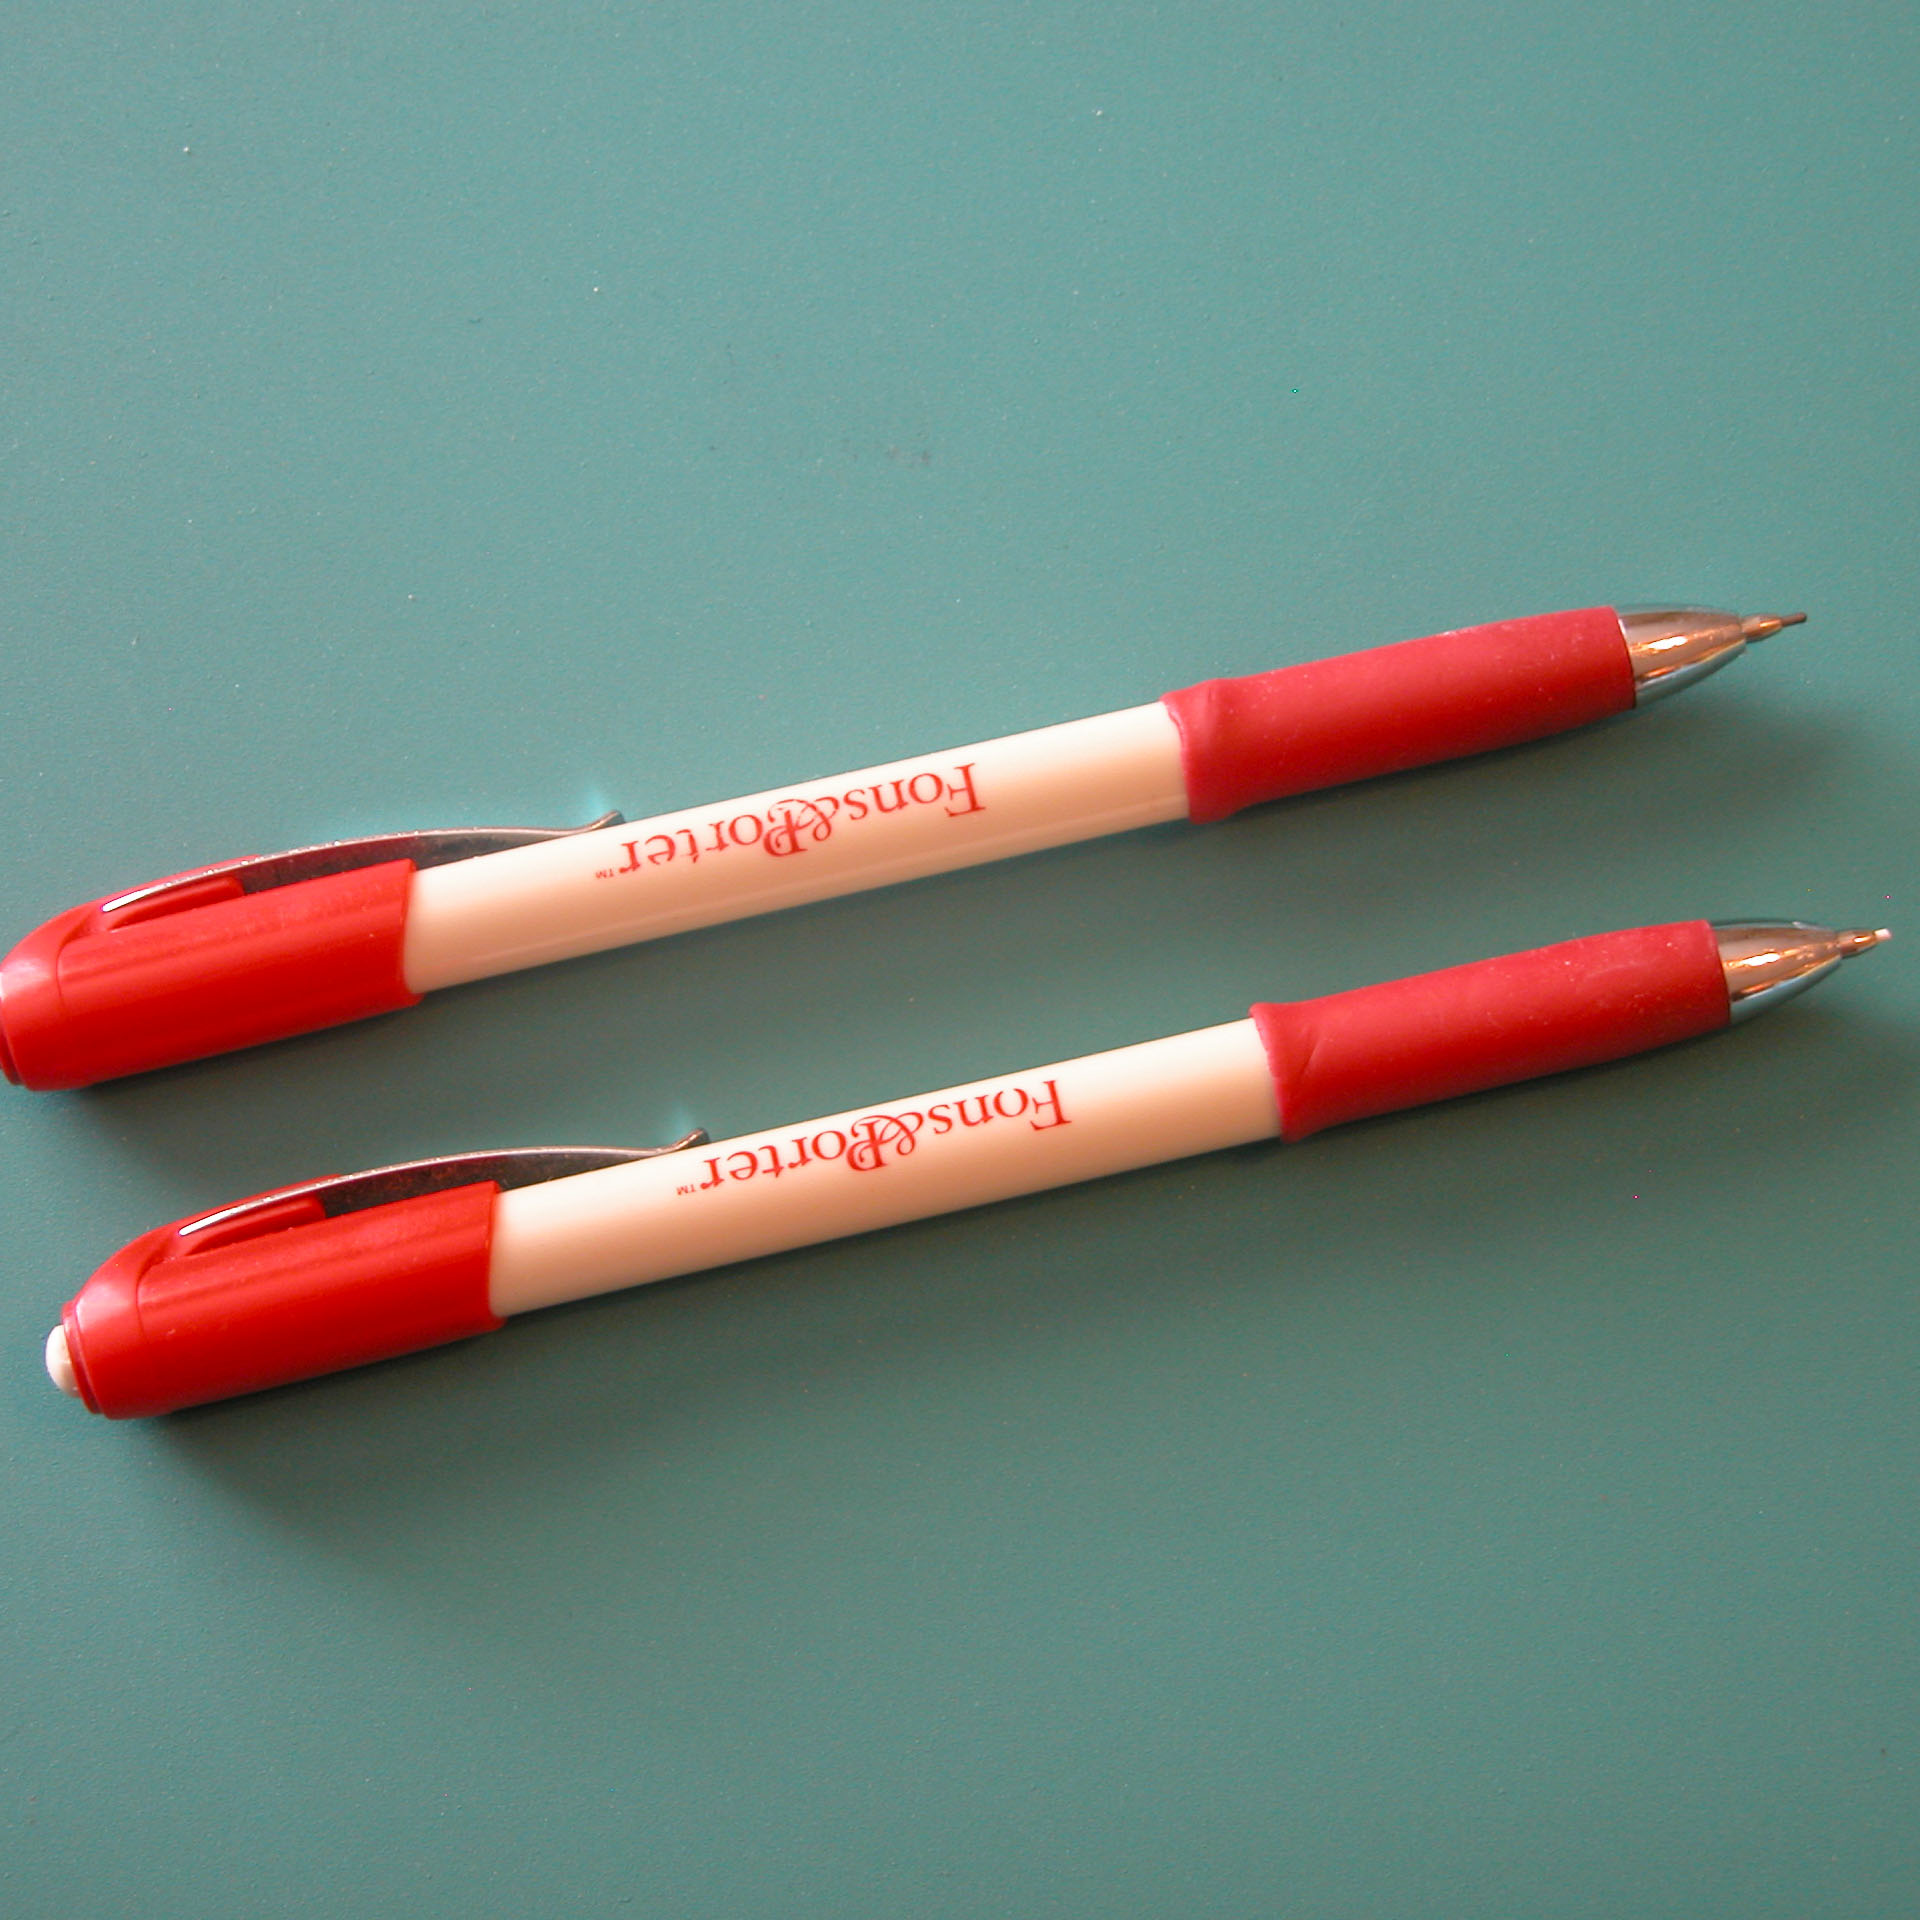
My ever ready Fons And Porter marking pencils – one light, one regular pencil color

freezer paper pattern marked with dotted pencil pokes!
with paper pattern removed, simply connect pencil dot to pencil dot!
The most basic of marking tools are the mechanical pencils with leads made for fabric. Fons and Porter and Sewline are the most popular lines. I keep two Fons and Porter pens loaded – one with a white or colored lead, and one with pencil colored lead. I use these extensively in all my sewing. They make a beautiful fine line and I can mark any colored fabric. To be honest I also have a Sewline (has two leads and a pen tip in one) that was a gift to me, but I have been frustrated with getting it ‘refilled,’ etc. For either pen, be sure to use the leads that are made for fabric to assure that the markings will wash out if you need them too. Many wool stitches cover the lines so that removal isn’t an issue. If you are trying to transfer a design, one of my more successful tricks is to make a copy of your design on a piece of paper ( I often use freezer paper and trace on the the paper side). Place the paper down on your wool/wool felt and use the mechanical pencil lead to poke through the lines that you have drawn, placing small dots along the lines and gently/slightly twist the pencil lead to leave a small pencil dot on the wool. Once you’ve ‘dotted’ all the lines, remove the paper and then ‘connect’ the dots with your pencil. See the two example photos above.

Hancys Ultimate White Marking Pencil – Iron Off

Quality of marking lines made by the Hancy pencil – on wool
Quality of marking lines made by Hancy white pencil – on wool
At the Minneapolis spring quilt market this past year, I ran into Hancy’s ‘Ultimate Marking Pencil, white, Iron Off’ I decided to purchase some to try. They are about 6″ long and about 3/8″ thick and come in a round plastic reusable tube for storage. The pencil actually feels more like a crayon or wax marking pen. And you will need either a large hole pencil type sharpener, or you can shave the tip using a knife or use a sandpaper sharpener to rub to a point(I thought only artists and art students did that!) It is nice to have a white marker, especially since there are so few out there, and I can attest to the fact that a bit of heat from the iron easily removes the marks! If you look at the photos above, you can see the quality of the lines the marker made on felted woven wool. Not exactly fine lines; depending on what you are doing, they do provide what one might call ‘line guidance’. I found that I did have to sharpen the pencil frequently to get a sharper line – on regular cotton fabric this finer line worked well, but on wool, the fuzziness tended to make the point get dull quicker. There isn’t much out there in white for marking dark wool so I guess that this pencil has it’s place for wool workers – just don’t expect fine lines!
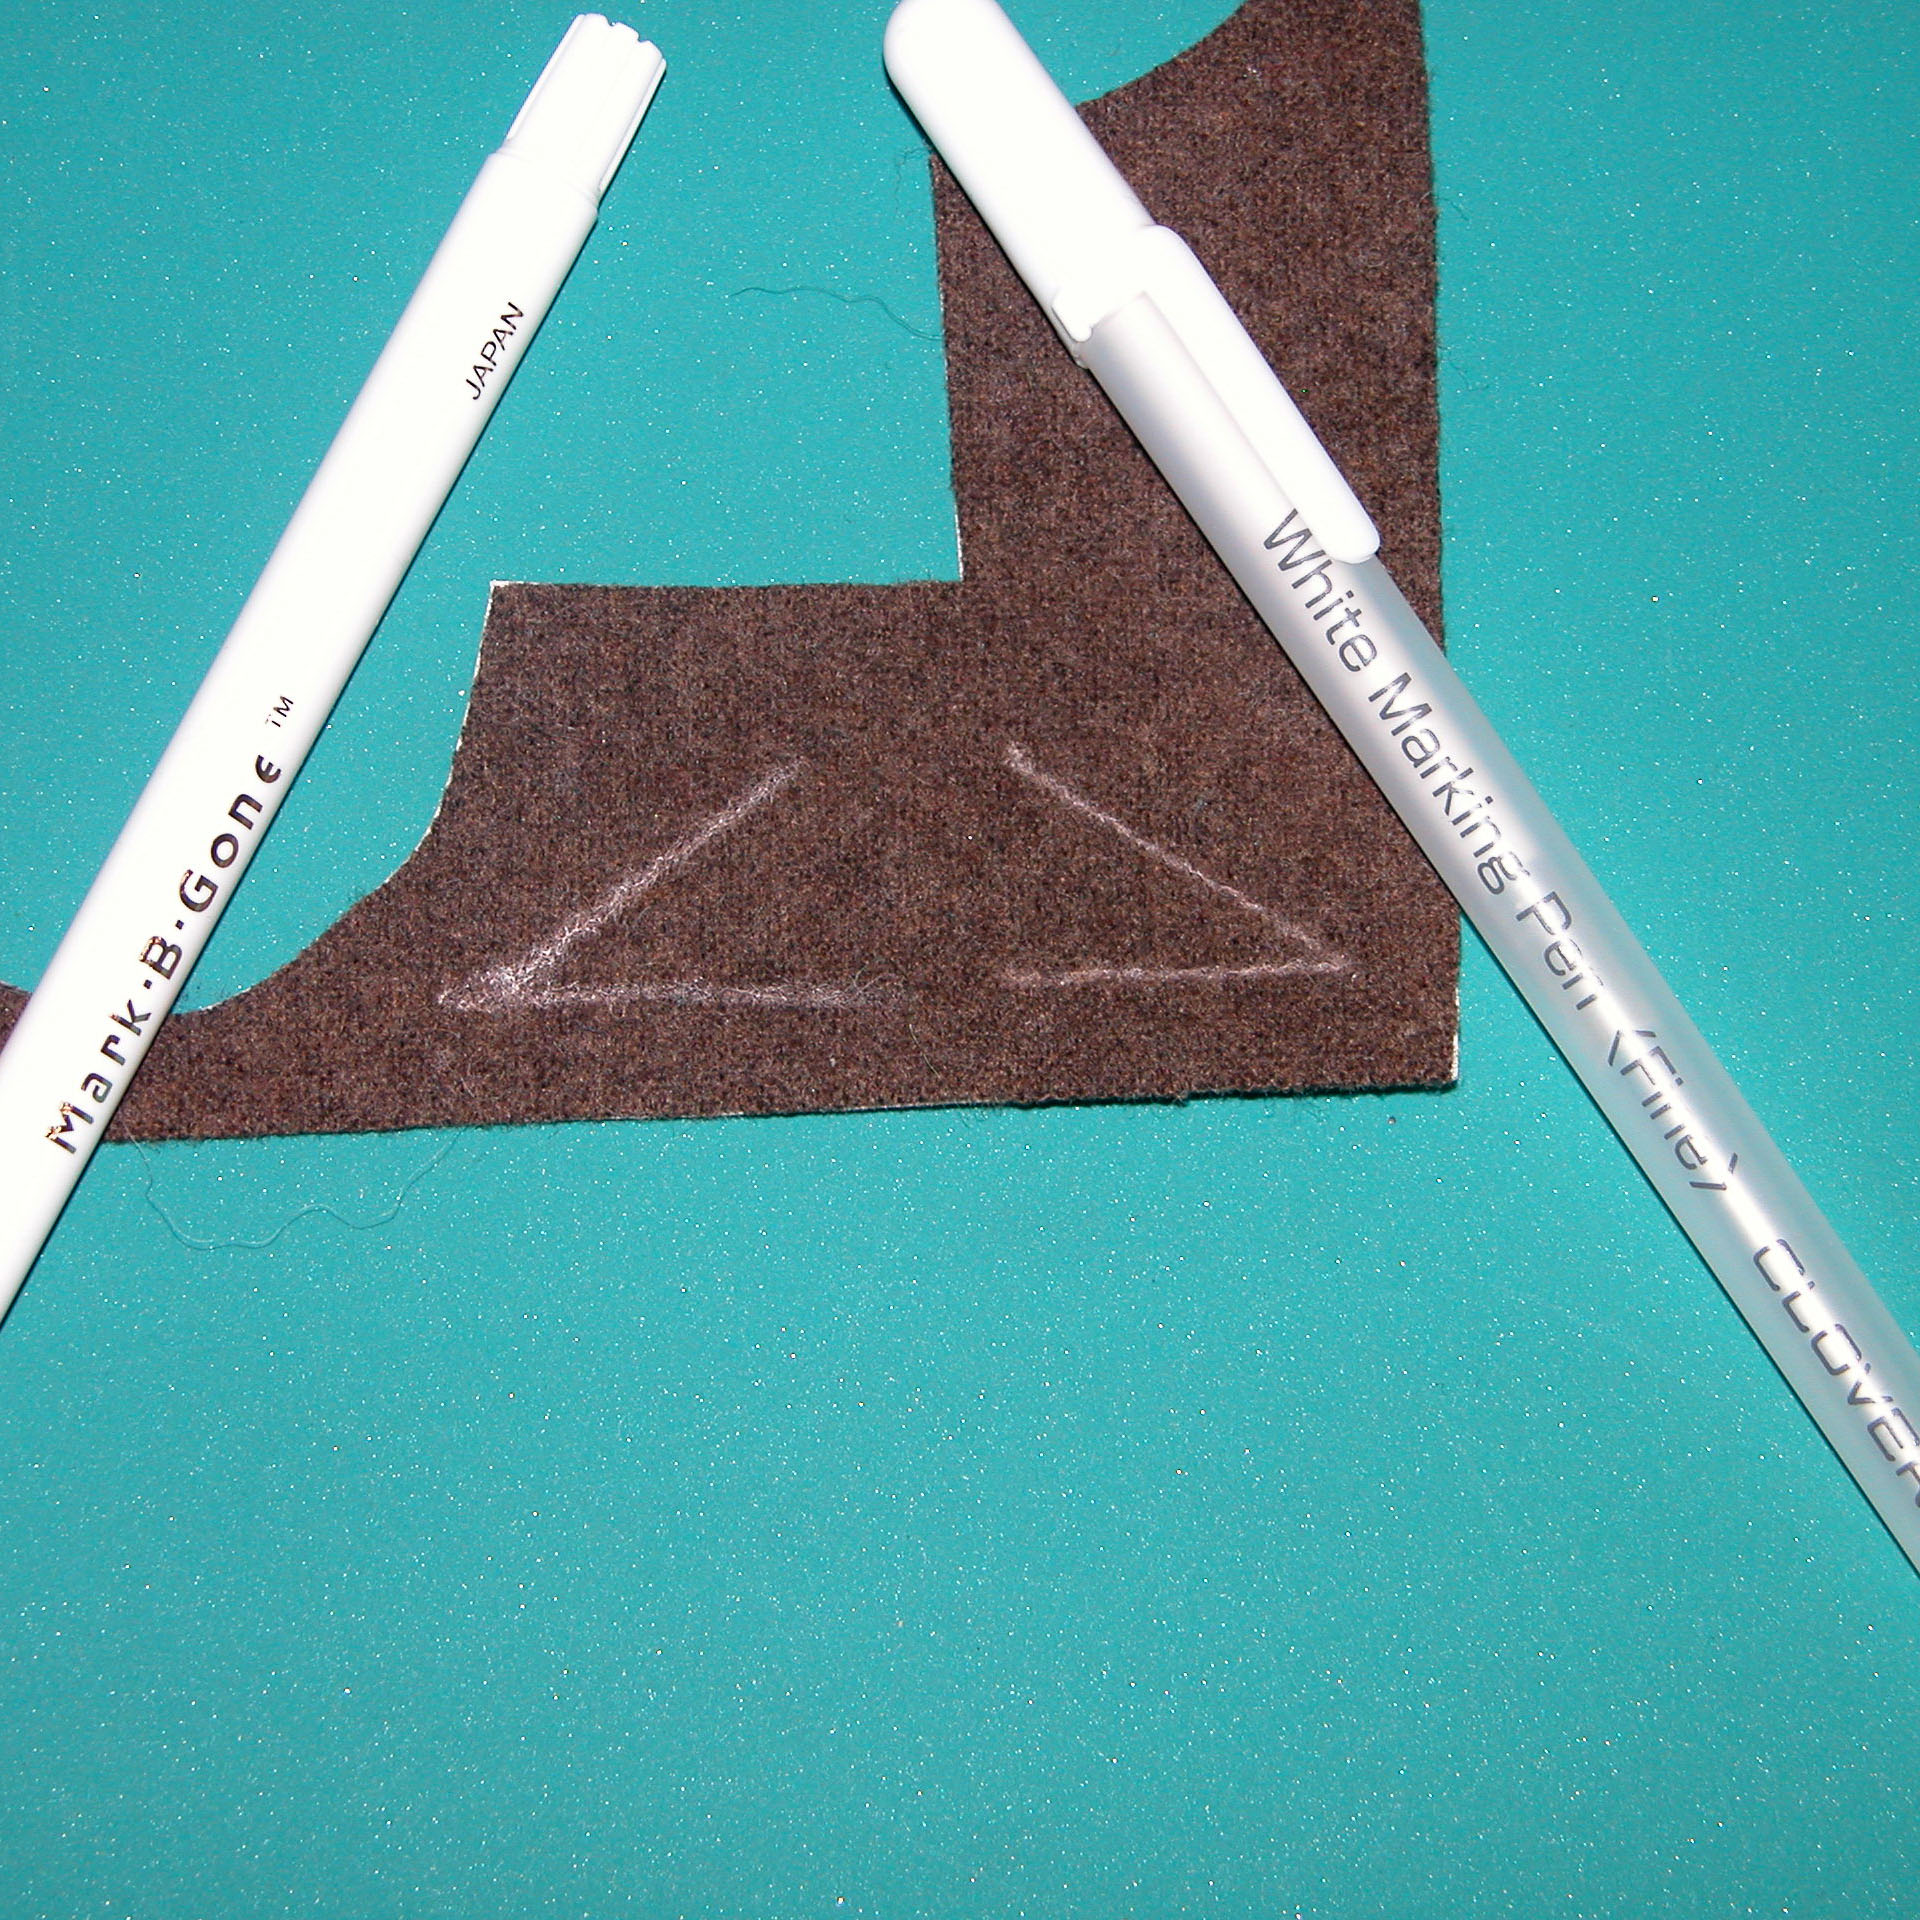
Last year I purchased two different white marking pens, hoping to get a finer line than with the Hancy’s pencil. I purchased a Clover White Marking Pen(Fine) and a pen called Mark B Gone (made in Japan) by Dritz. The Clover pen reminds me of a gel pen with a firm metal point: it is removed by heat via an iron. The Mark B Gone has a hard felt tip point and the marks are removed via water. In the picture above you can see the marks that each made on a piece of Pendleton felted woven wool (that had a fusible backing applied). You can see that the line is somewhat finer than the Hancy marker. The trick of either of these pens though – is that you have to be patient when drawing out your lines as the white doesn’t show up right away. At first you will run the pen over your line and nothing will show! Only after a few more repeats does the white line show up! The directions for both of these pens warn you of this. However, the white lines do eventually show up and they seem to stick around for a good while. The Clover pen marks can be removed with an iron/heat, while the Dritz Mark B Gone marks need to be rubbed with a wet cloth or washed to disappear.
Press N Seal with computer letter pattern
fine tipped sharpie ready to mark PressNSeal
PressNSeal with letters marked/traced
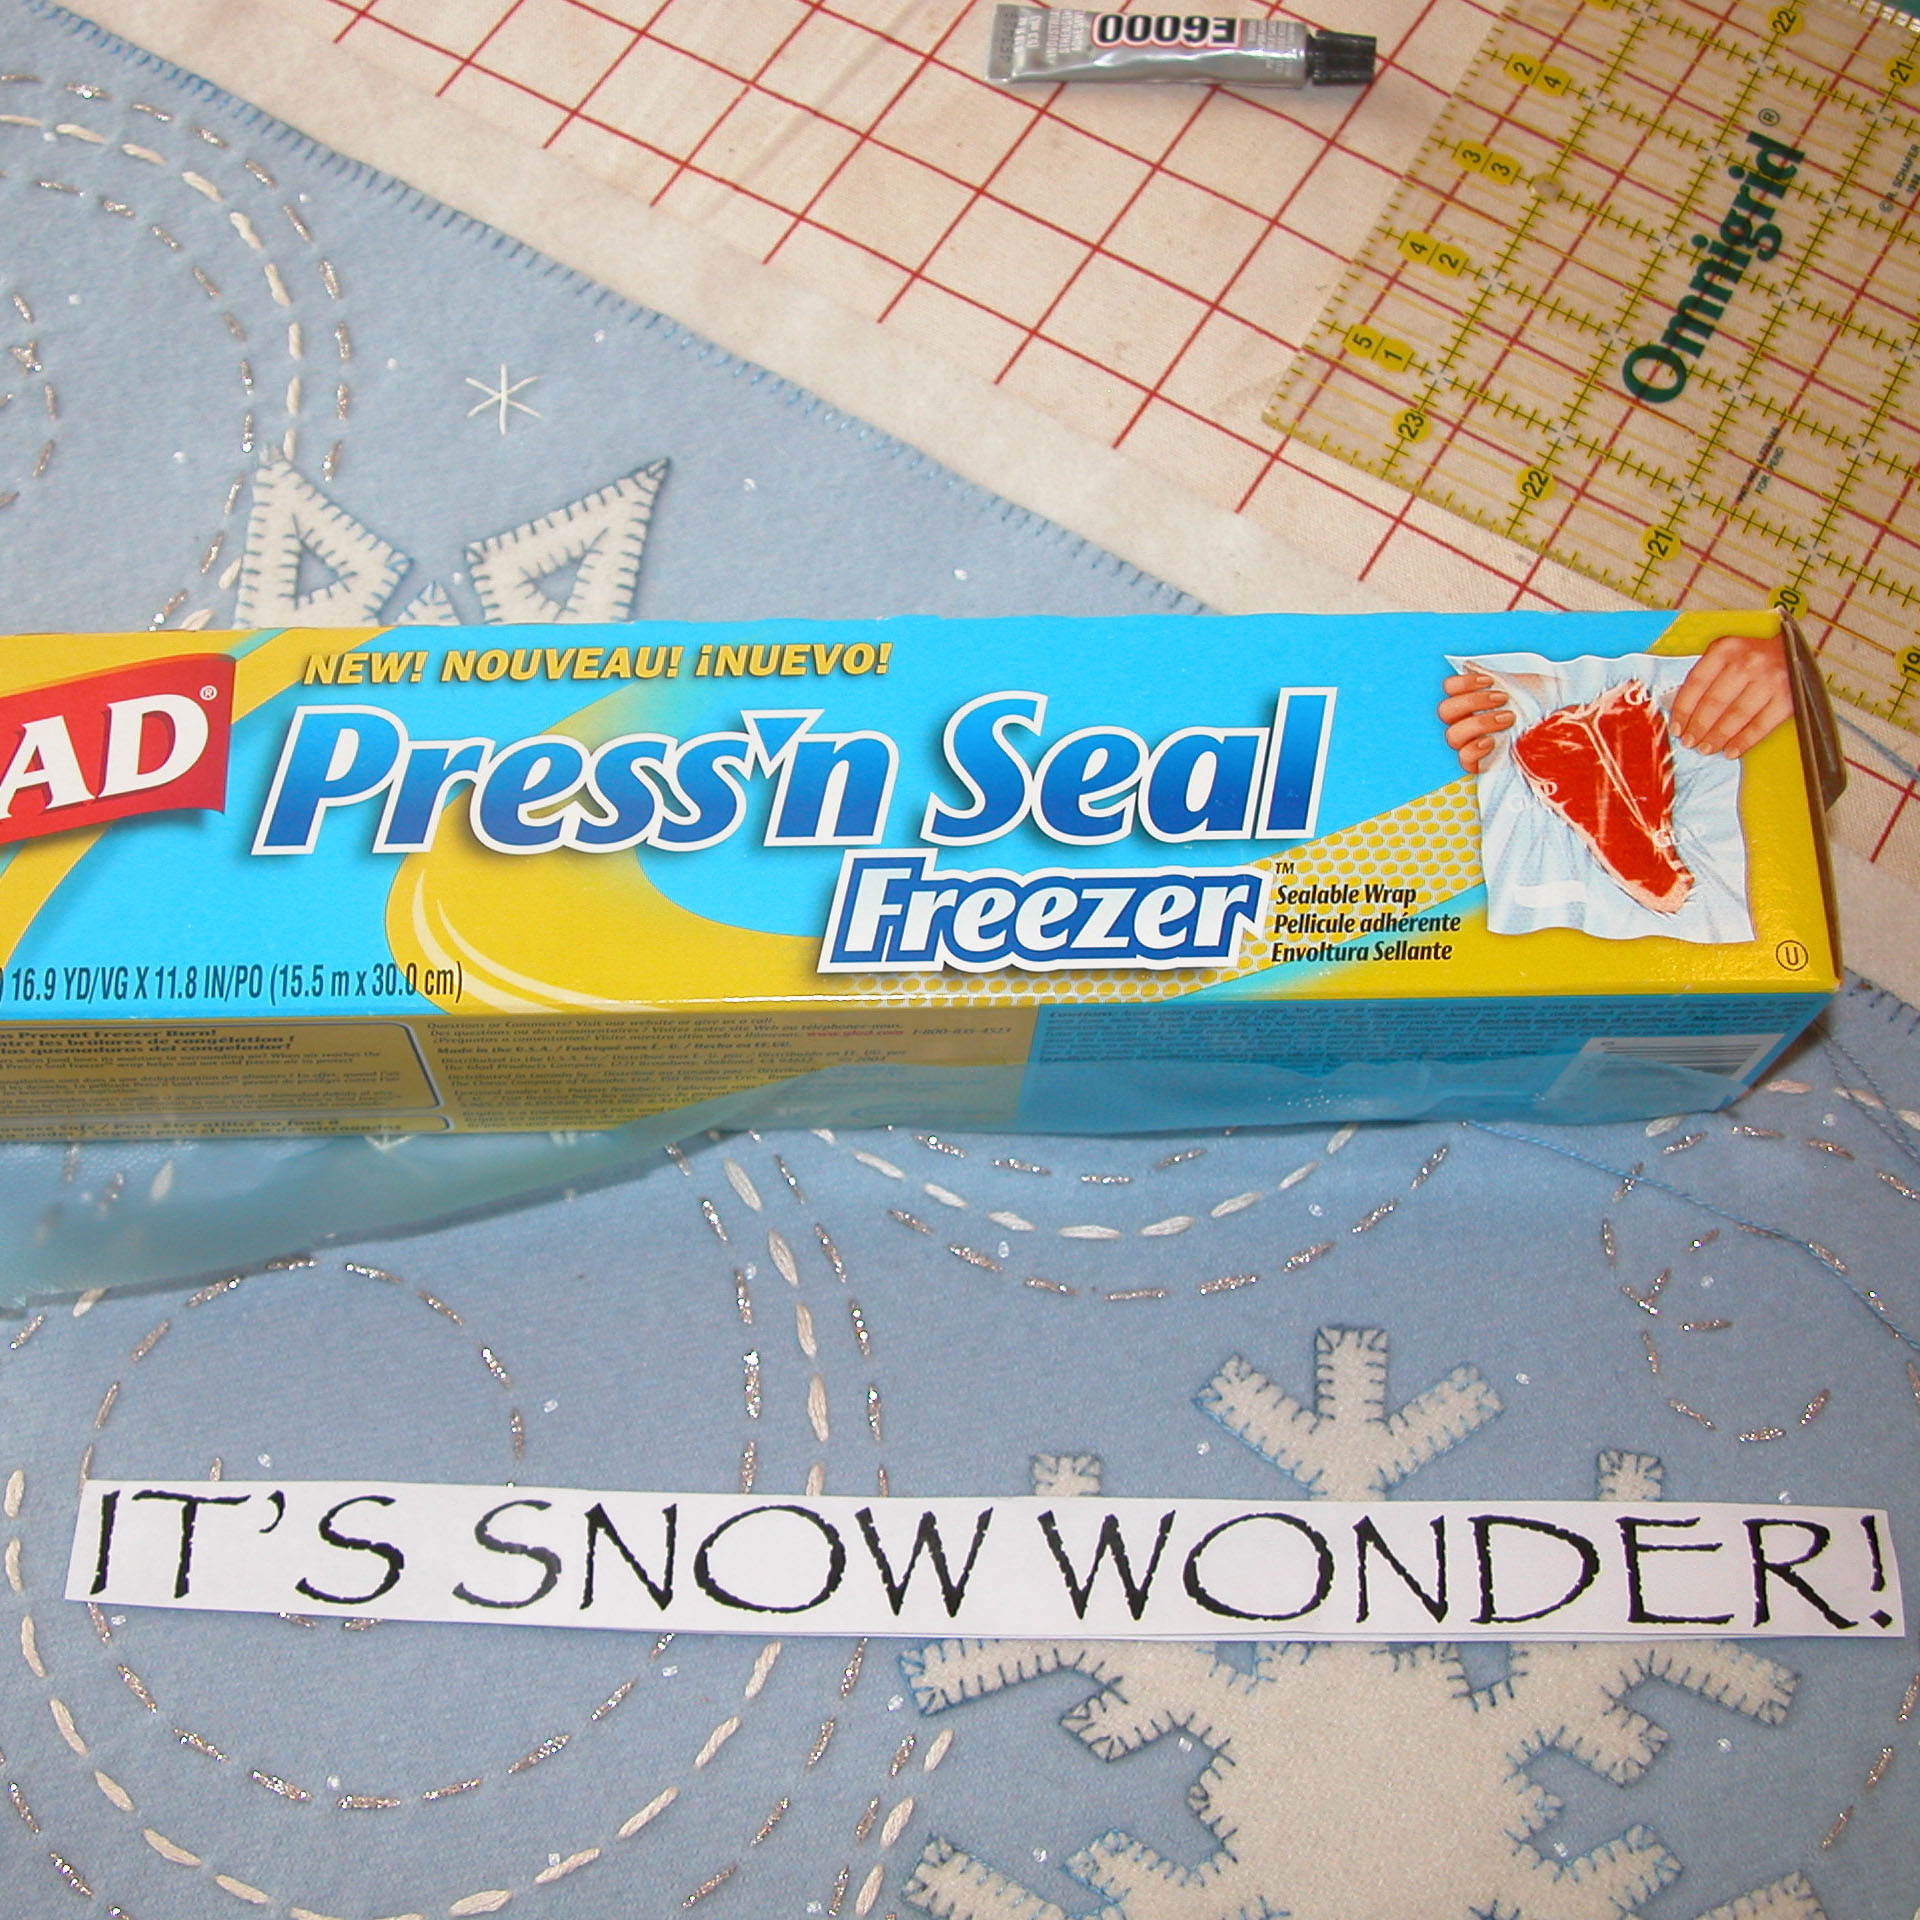
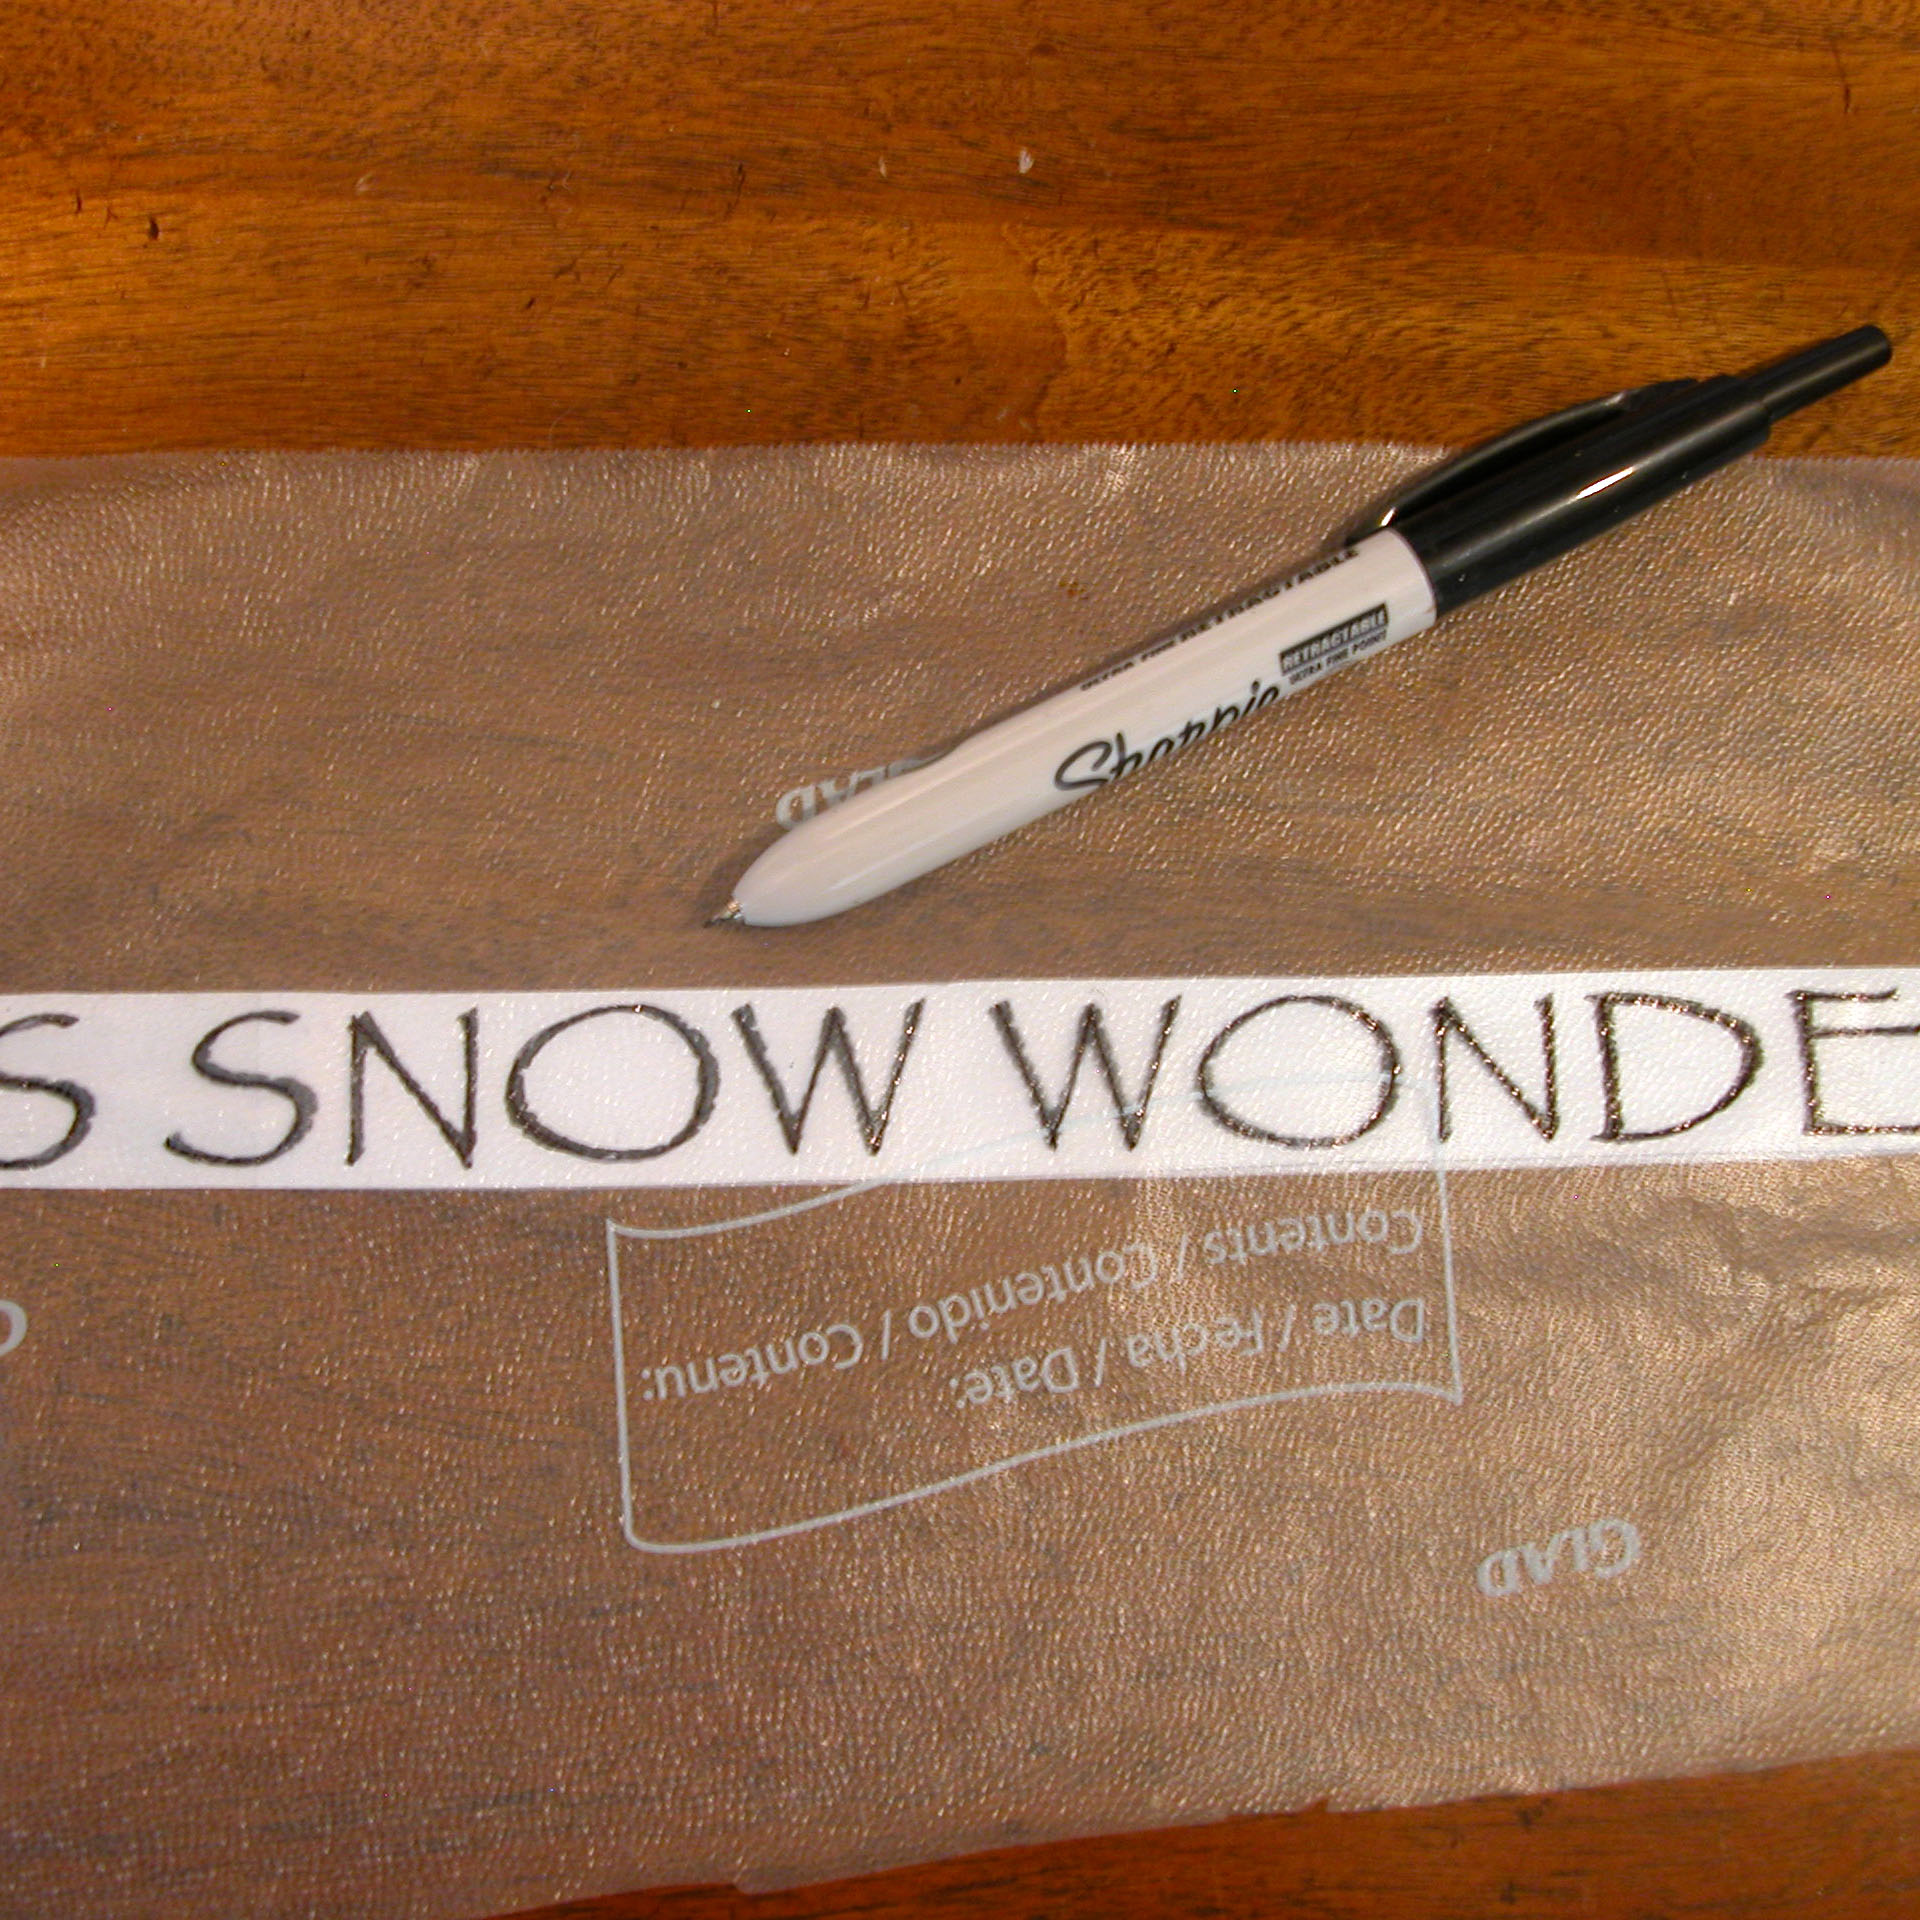
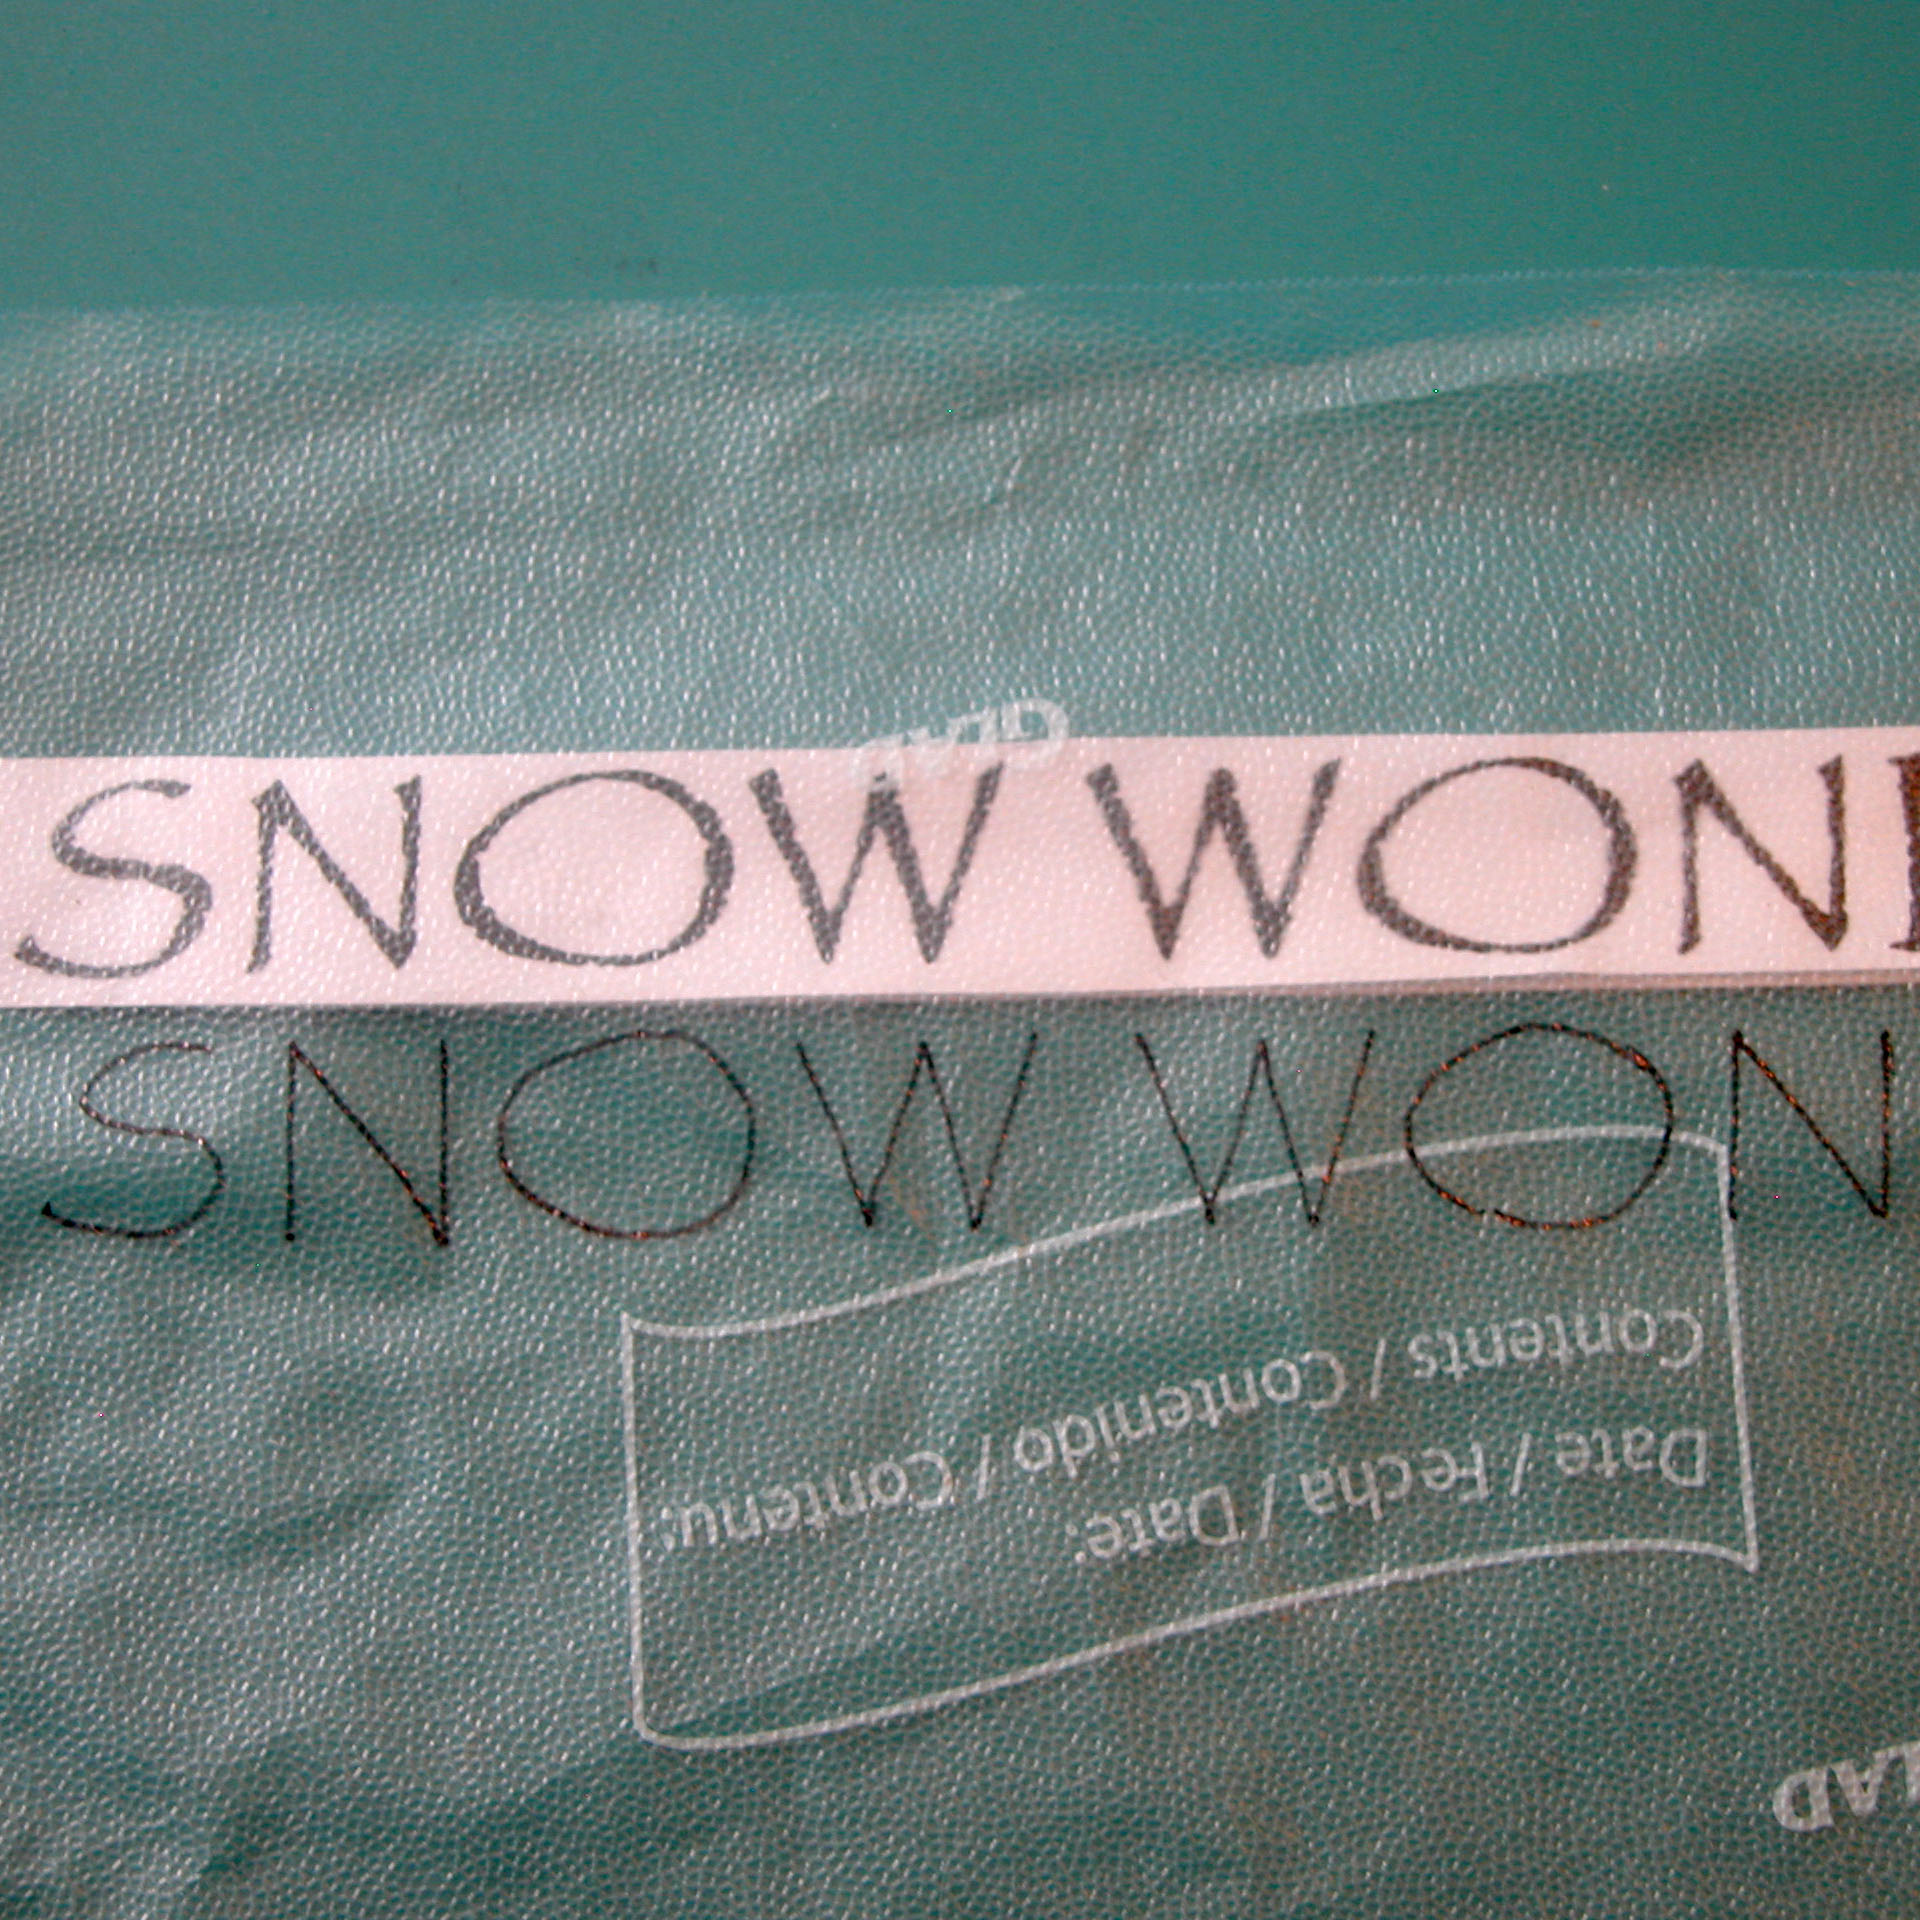
The method that has proven to be quite helpful in many circumstances is the ‘Press N Seal’ method of both marking and transferring designs. Who was the genius that discovered that the qualities of Glad’s Press N Seal plastic wrap worked on wool? The adhesive quality of the Press N Seal allows you to stick it over your pattern for tracing and then to once more stick it on your wool/wool felt so that you can stitch right through it, exactly following your design. True, it is a bit finicky to pick it off once the stitching is done, but I personally haven’t found that process to be too time consuming or tedious – just another step done with a bit of care. Besides, the results are very much worth it. Yes, there are products for embroidery out there that could be considered quite similar, but let’s face it – this is cheap, works as well, and is readily available for most folks! In my photos, I was working on a light blue woven wool felt version of the Snow Wonder dark royal blue/black version that is in the heading picture (the royal blue version is National Non Woven wool blend felt). I had used press and seal on the royal blue felt version, so wanted to see how it would do on the woven felted wool. In the first photo, you will see that I laid out my Press N Seal, along with my computer made text which was made to size for the piece. The middle photo shows the paper text placed under a large piece of Press N Seal – big enough to cover the area I would be stitching by at least 2-3 inches on all sides – ready to be traced with a fine tipped permanent (don’t want the ink coming off on your thread!) sharpie in a color that I will be able to see on the wool. The last photo shows how the traced Press N Seal looks. (Be sure to put the sticky side of the Press N Seal face down when tracing!)
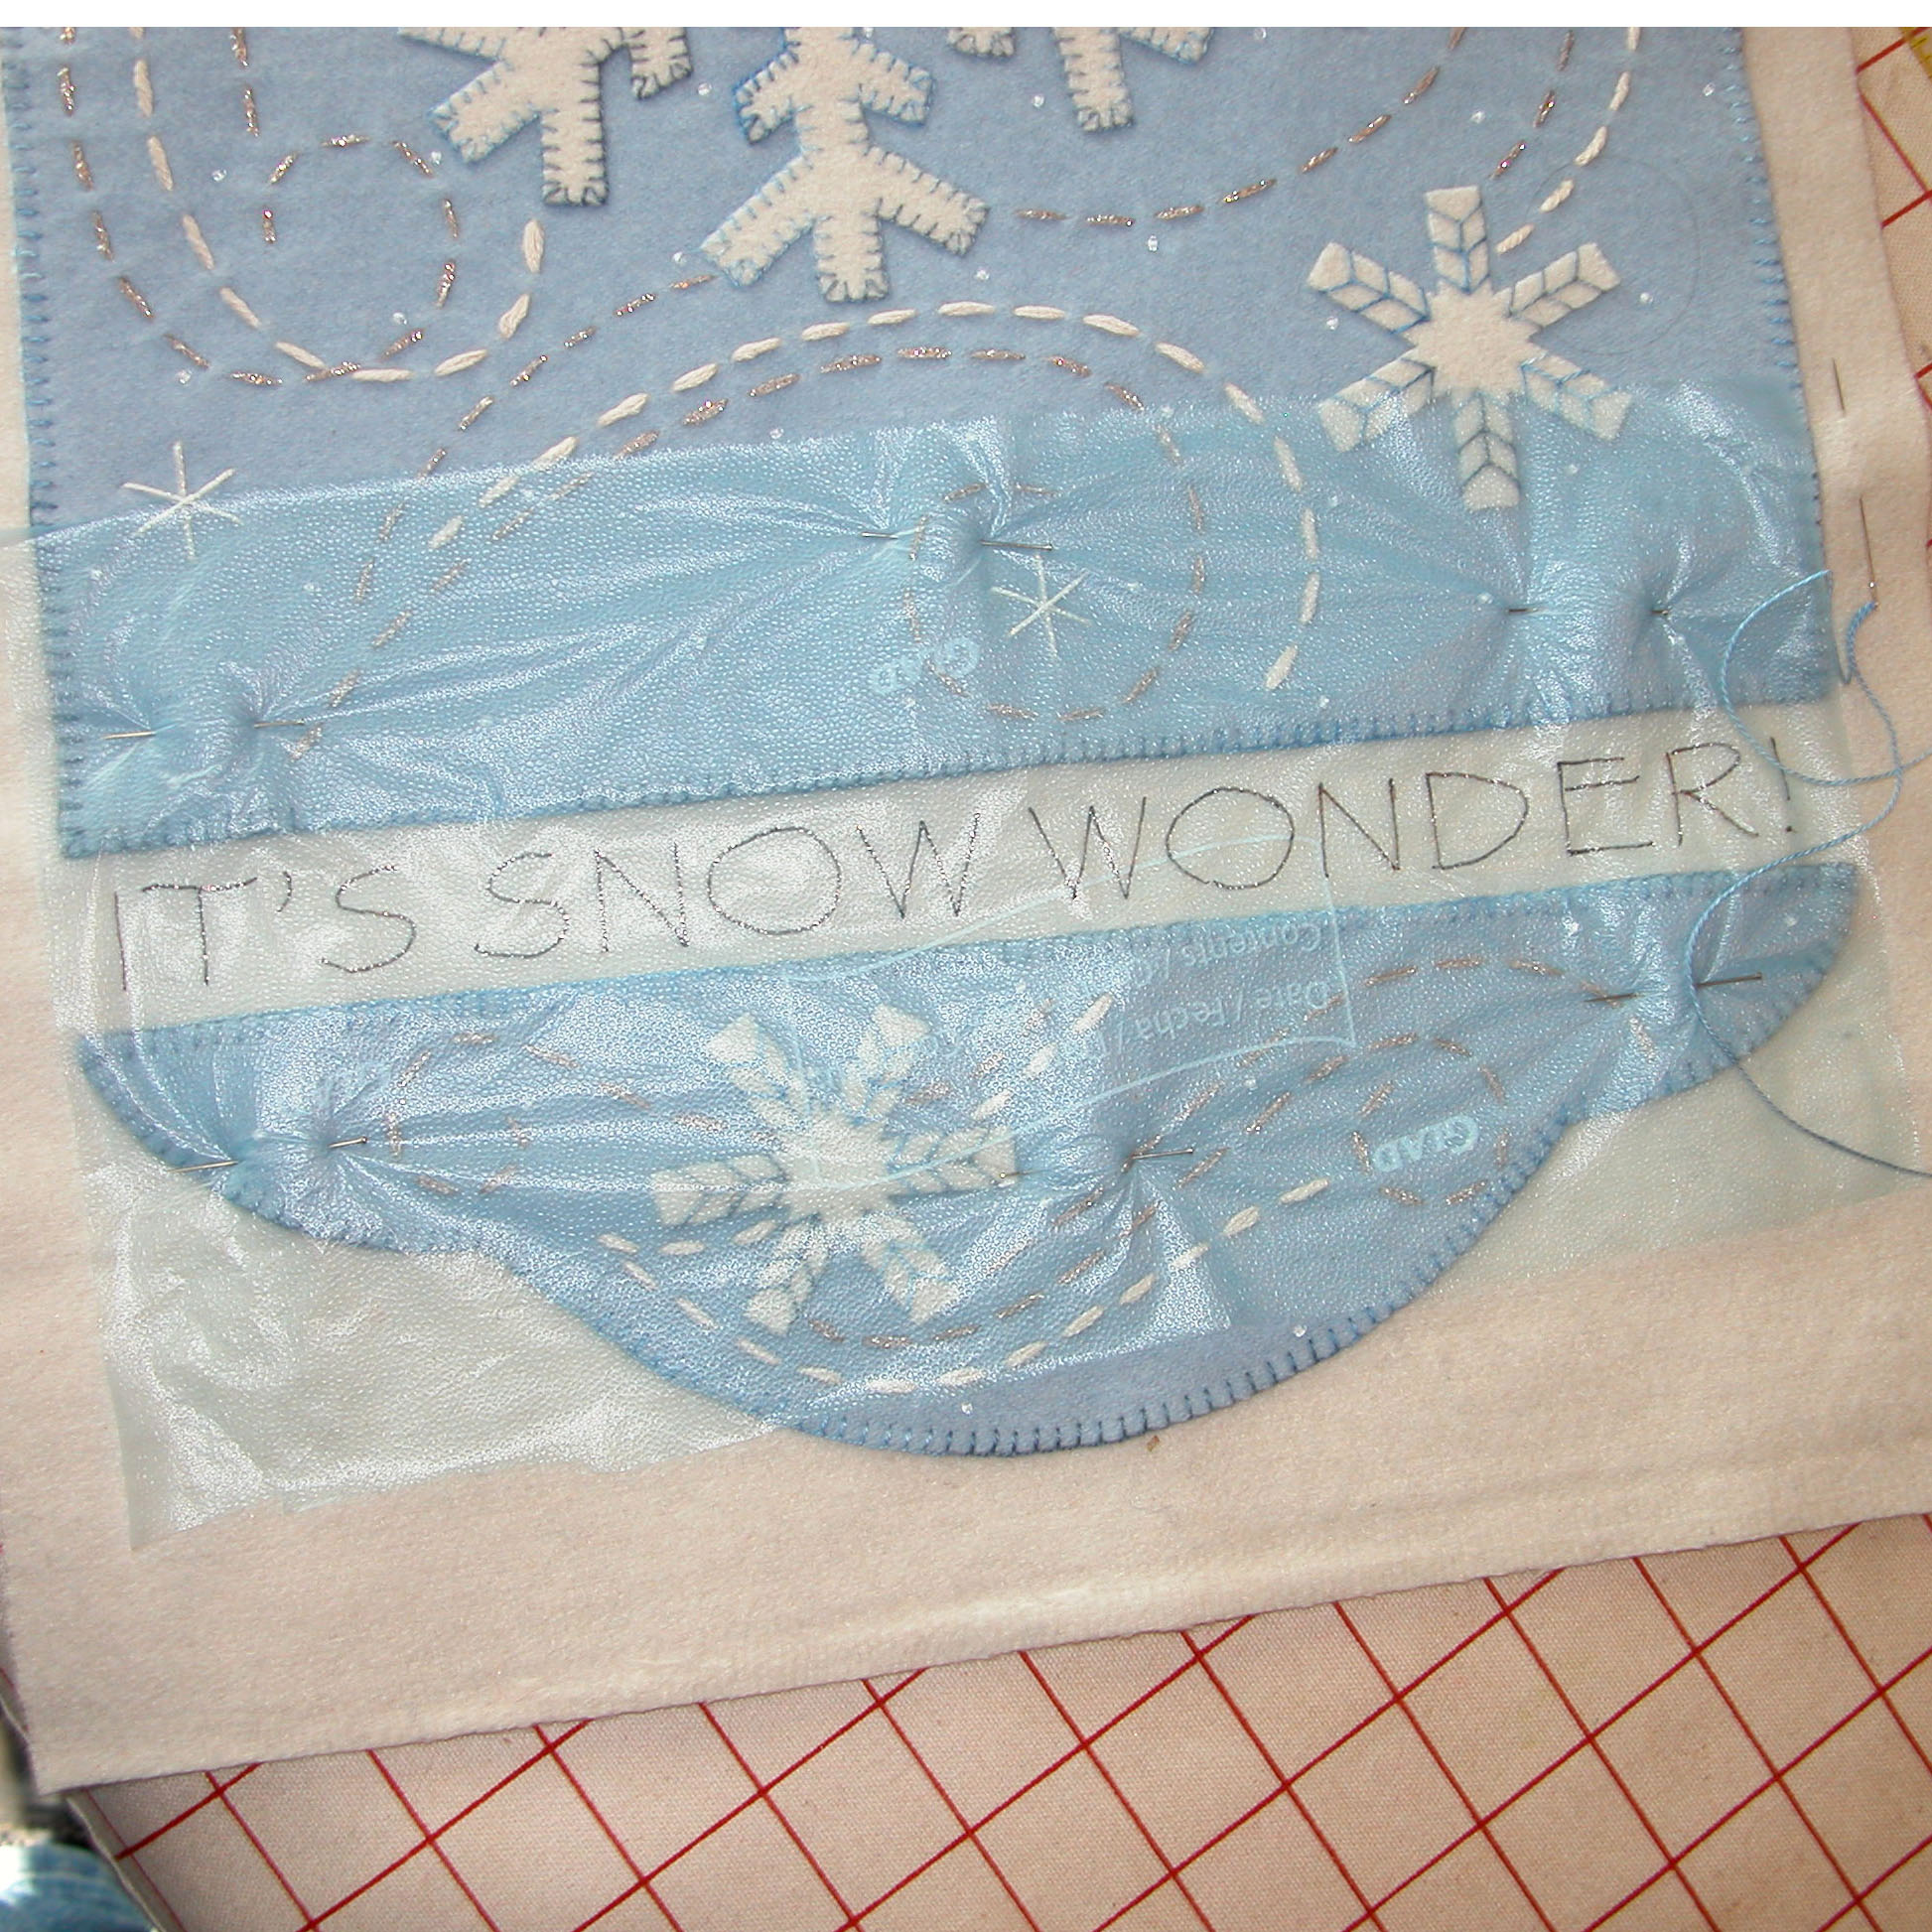
Press N Seal traced text placed on wool
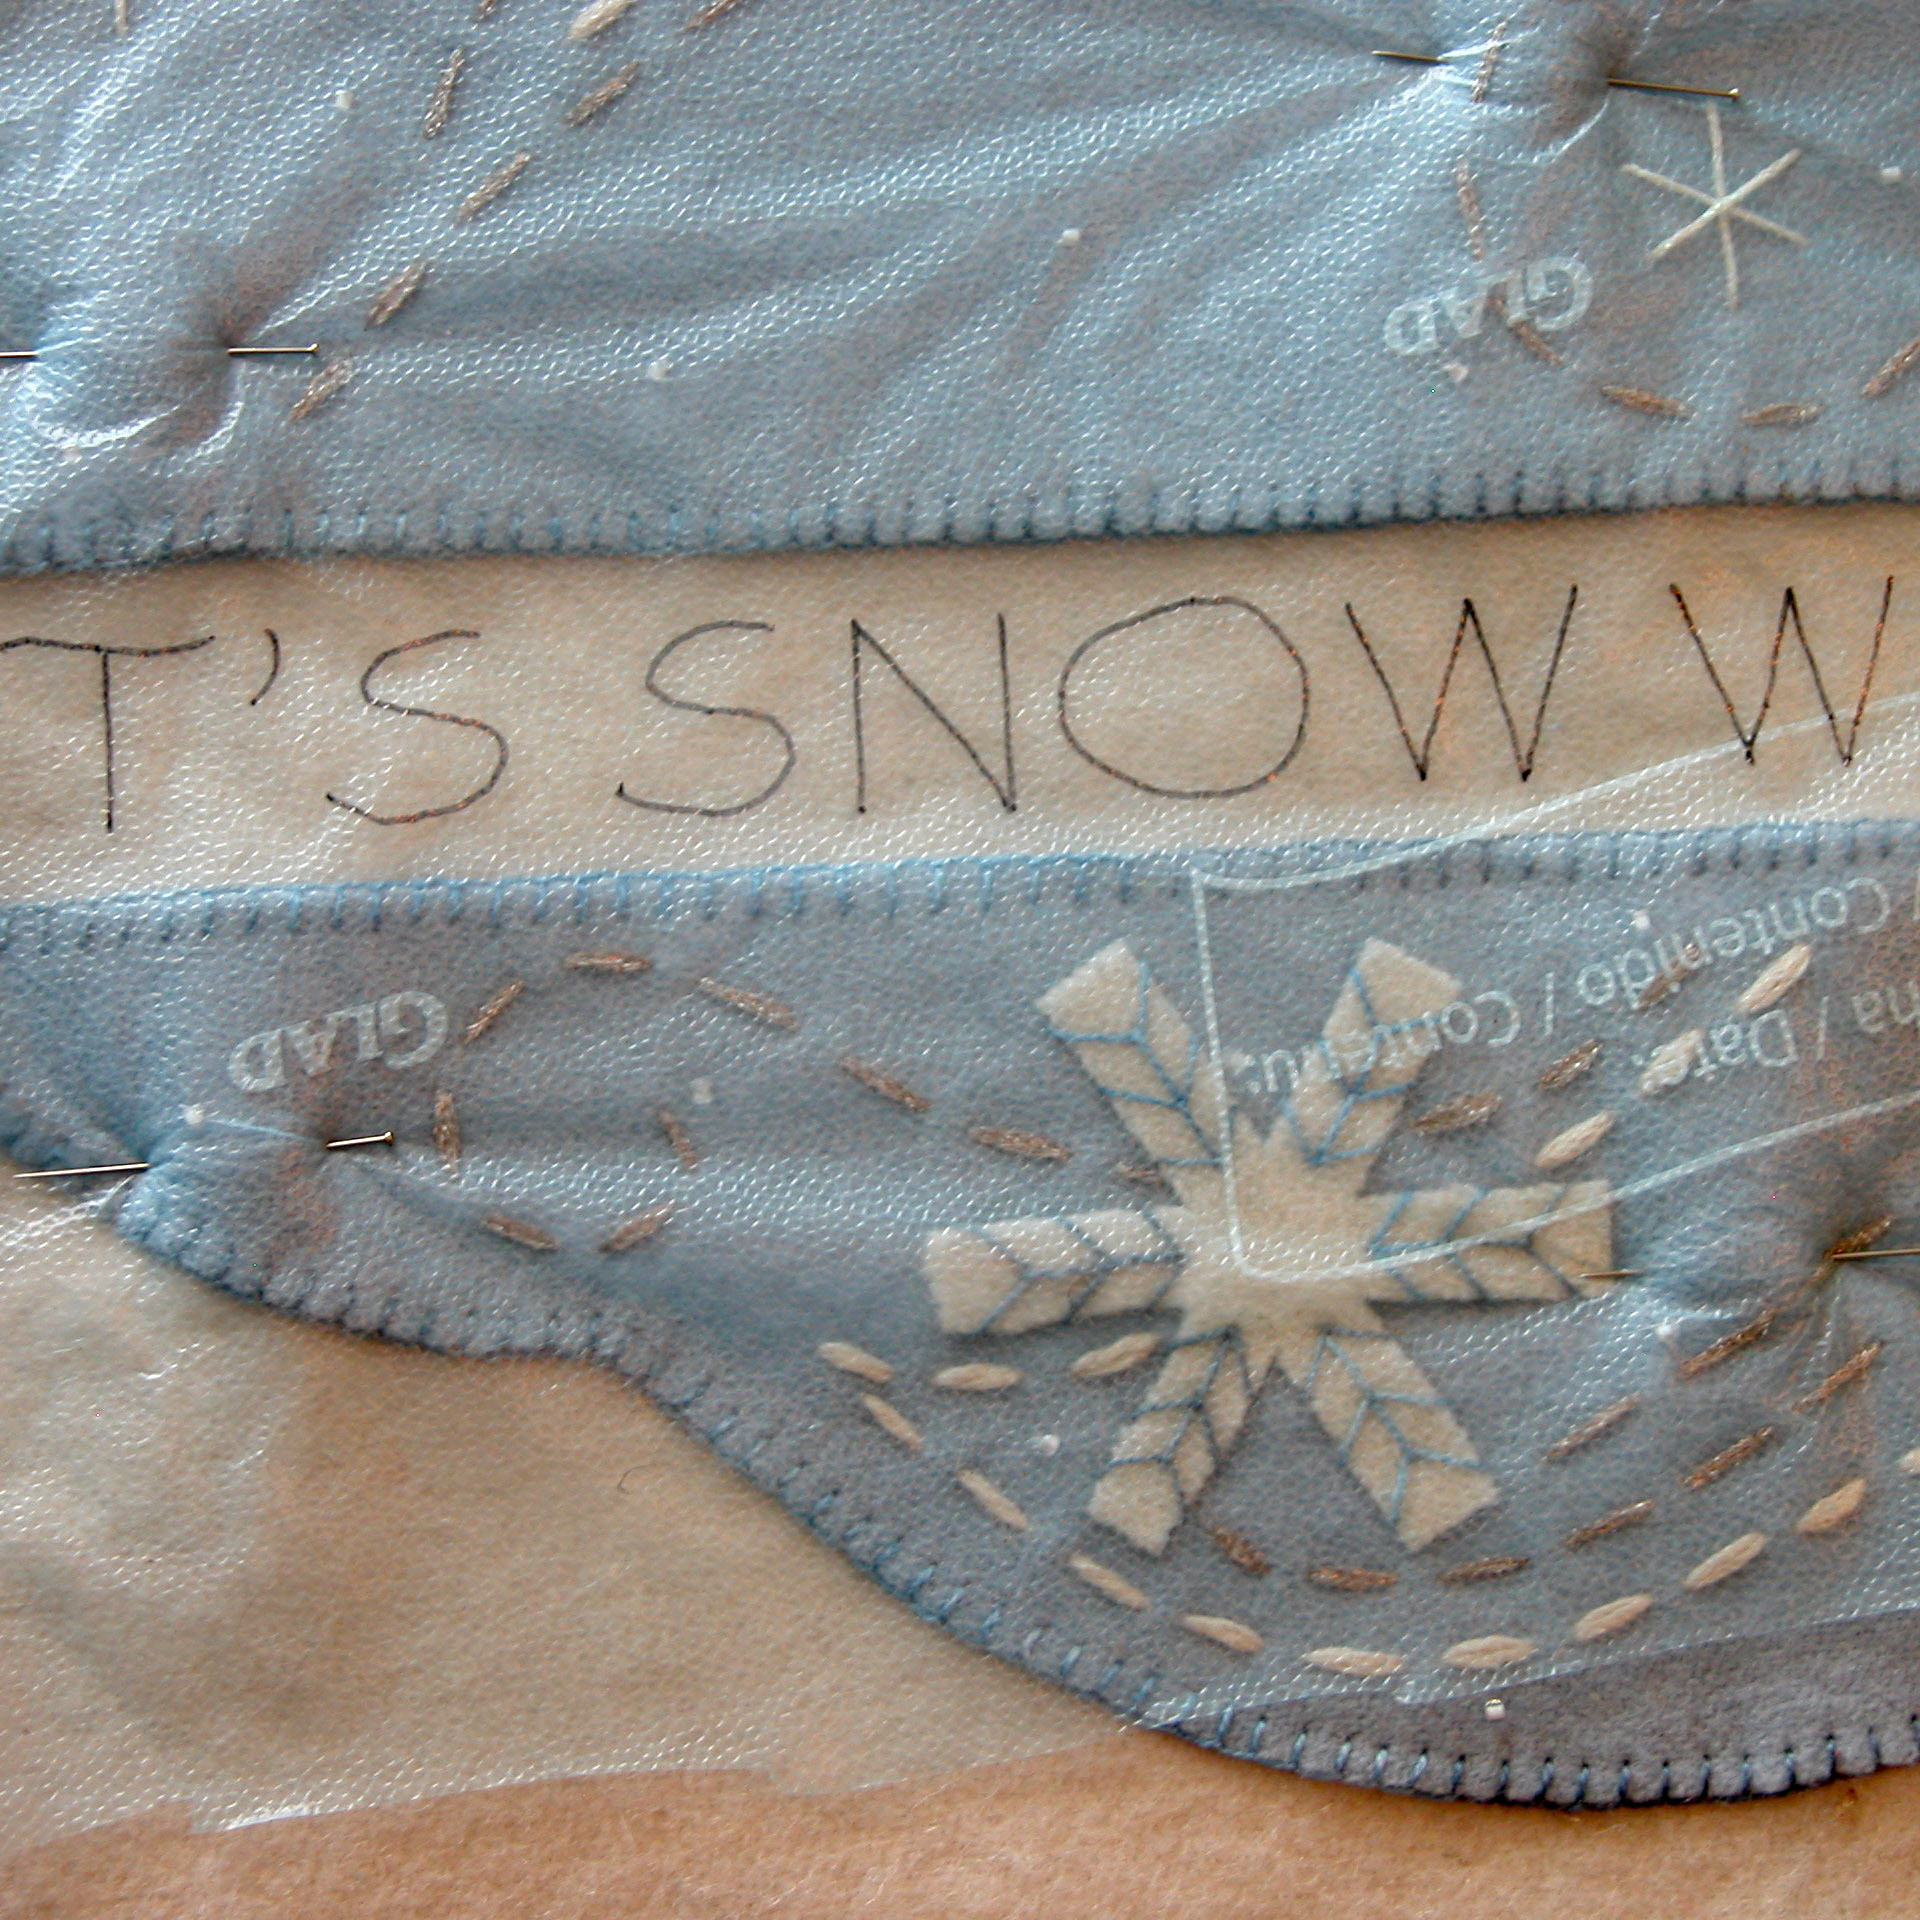
close up of Press N Seal traced text placed on wool
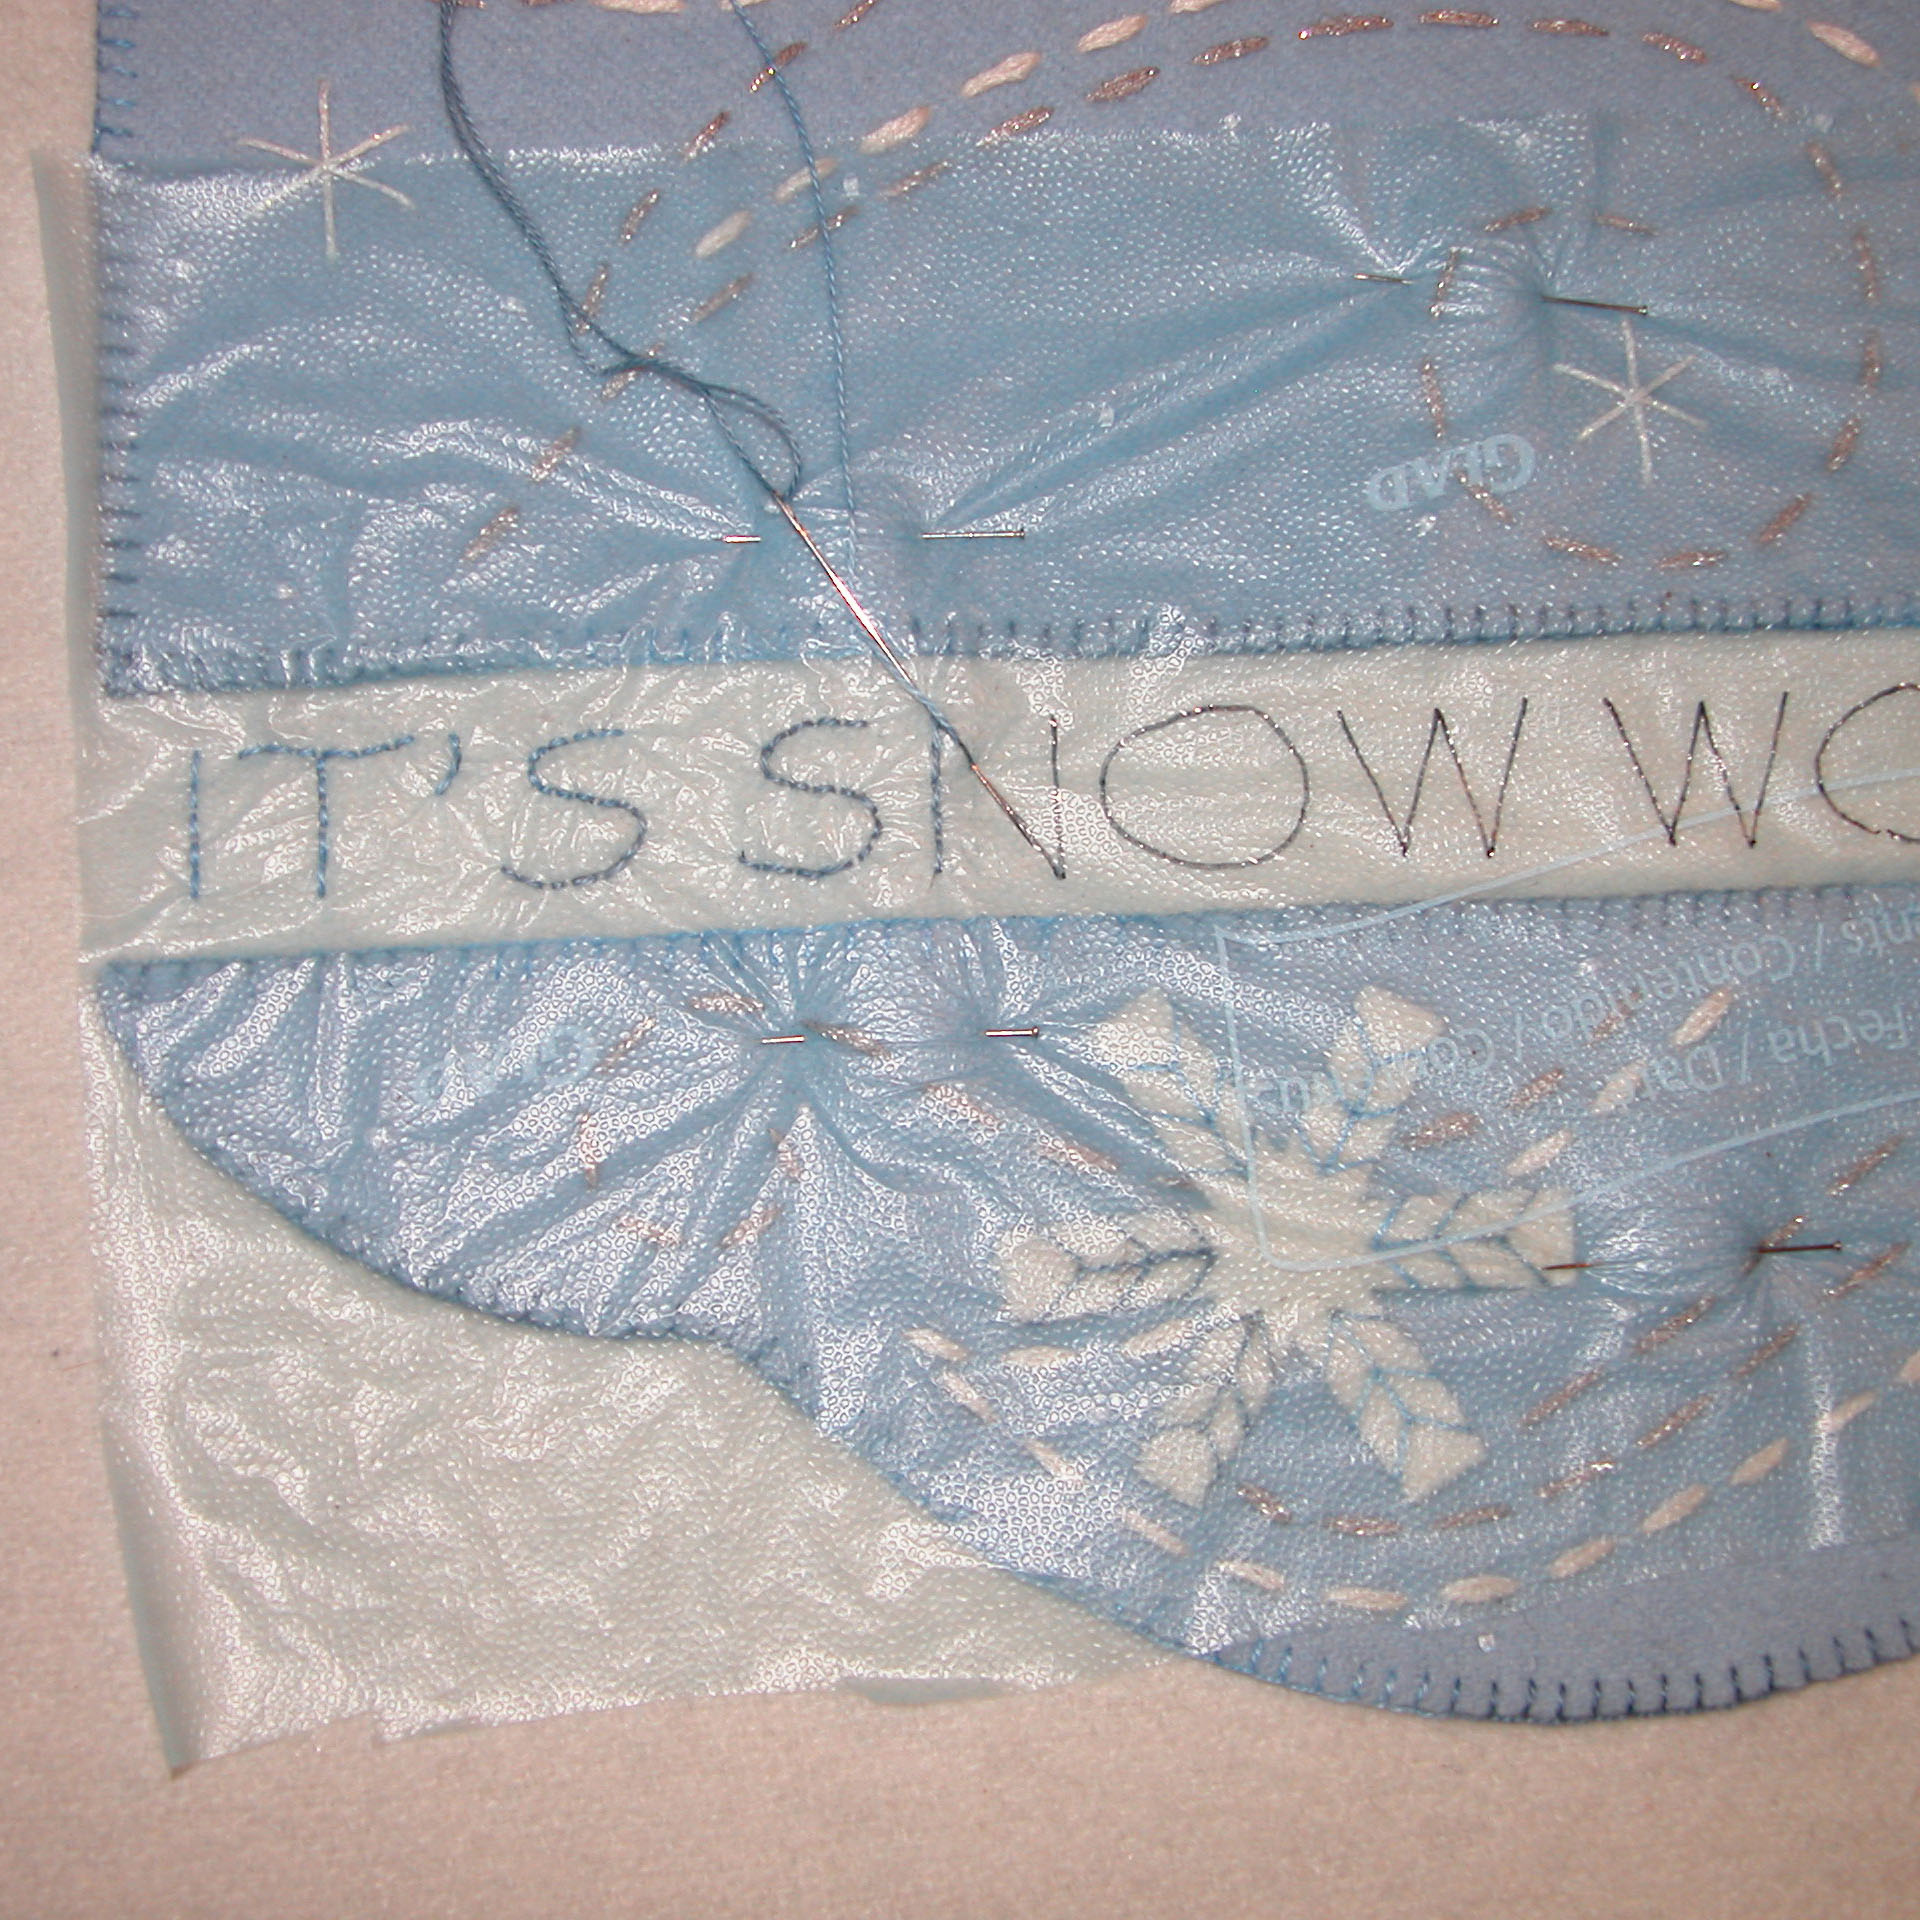
Beginning to stitch through Press N Seal with pearl cotton
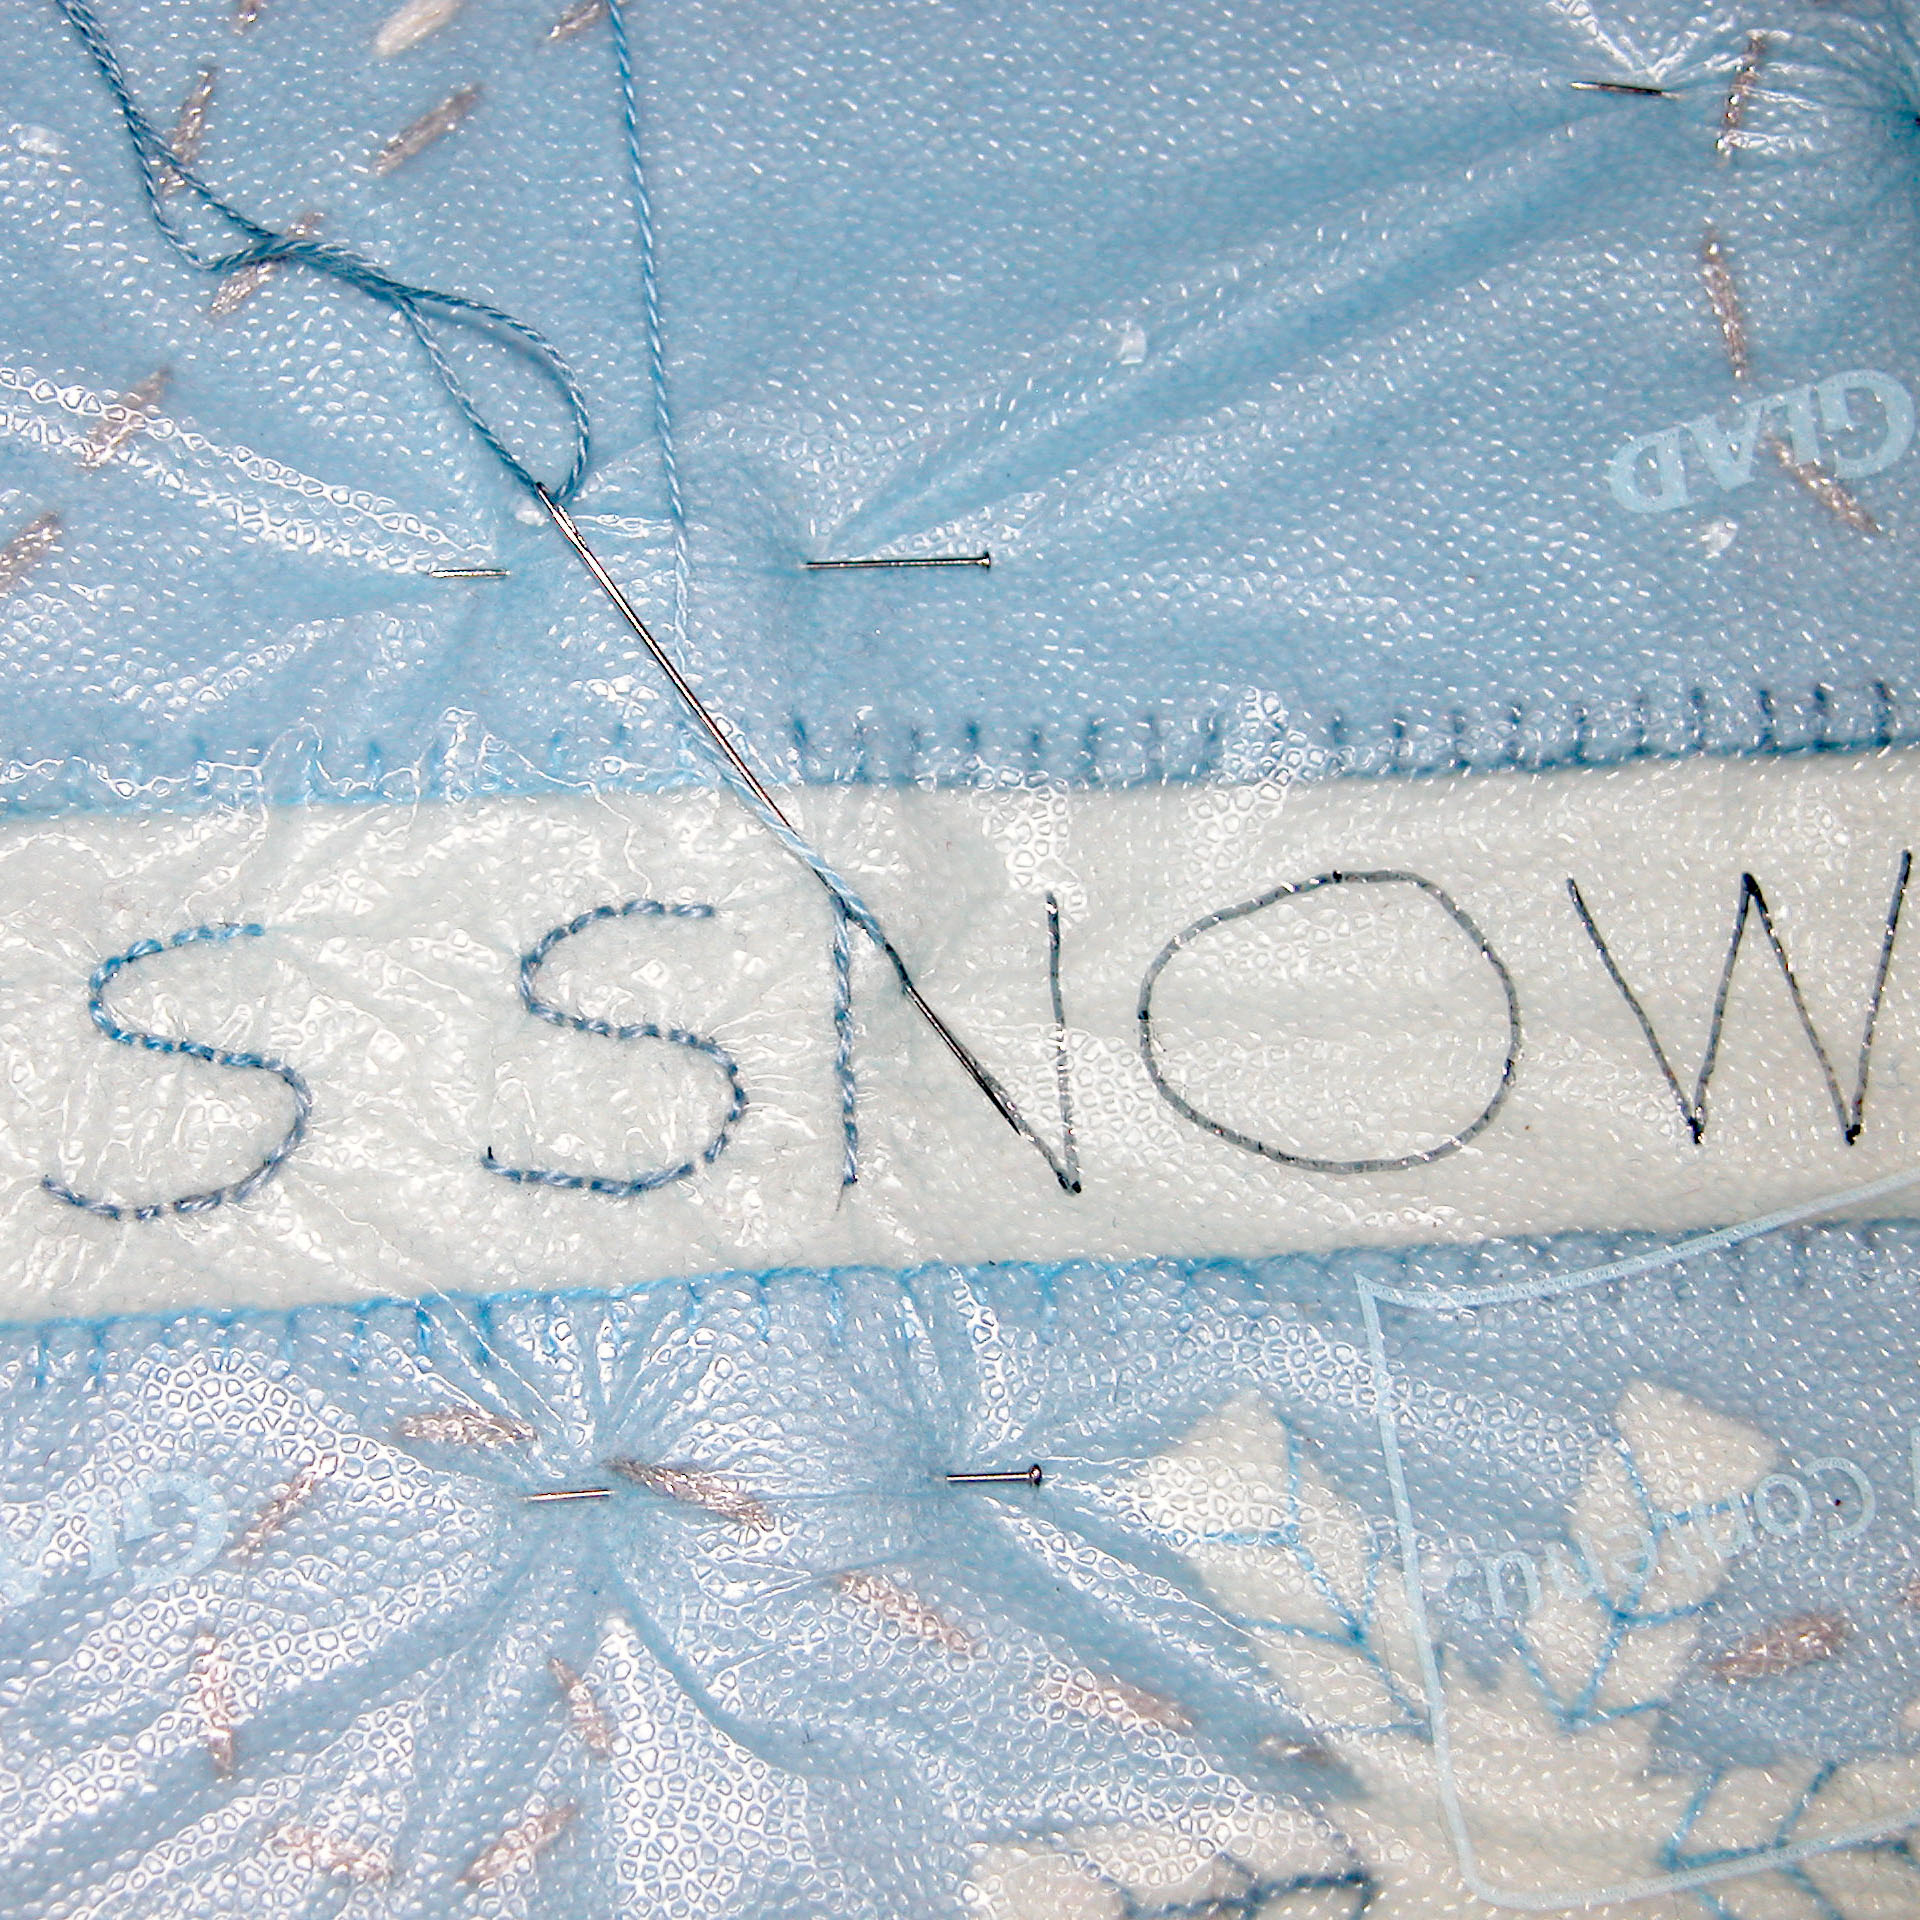
Close up of back stitching through Press N Seal

close up of finished back stitching on woven felted wool

Finished text as stitched with the Press N Seal method
Once you have your design/text traced onto the non sticky side of the Press N Seal, place the Press N Seal on your wool/wool felt. Smooth it on with your hands and use some pins on the outside perimeter to make sure it stays in place. Look closely at the photos above. Once your Press N Seal is in place, you can begin to sew and embroider. A couple of notes here: 1) stitching though plastic will wear on your thread a bit more than usual, so if you are like me and tend to use longggg lengths of thread, be forewarned that the thread may wear thin and break sooner than you think. Probably its best to use shorter lengths of thread 2) be sure to make ‘firm’ stitches and pull them snug – not tight – just snug! This will make it easier to get nice looking sitches as you rip out the Press N Seal. 3) consider your choice of stitches – stem, outline, back, and running stitches work very well; you may want to experiment with more complicated stitches to see how well they survive the removal of the Press N Seal. Once you have finished your stitching, you can begin removing the Press N Seal. I find it goes fastest if I carefully clip right next to a stitched line and then gently pull from the other side. If you must, use a tweezer to get out any small leftover pieces that get stuck in the stitching. When all the Press N Seal is removed, I steam press the piece. You can see how nice the backstitching comes out in the photos above. In the last photo, you can see the finished stitched text – and the wall hanging is ready for me to trim and put on a backing.
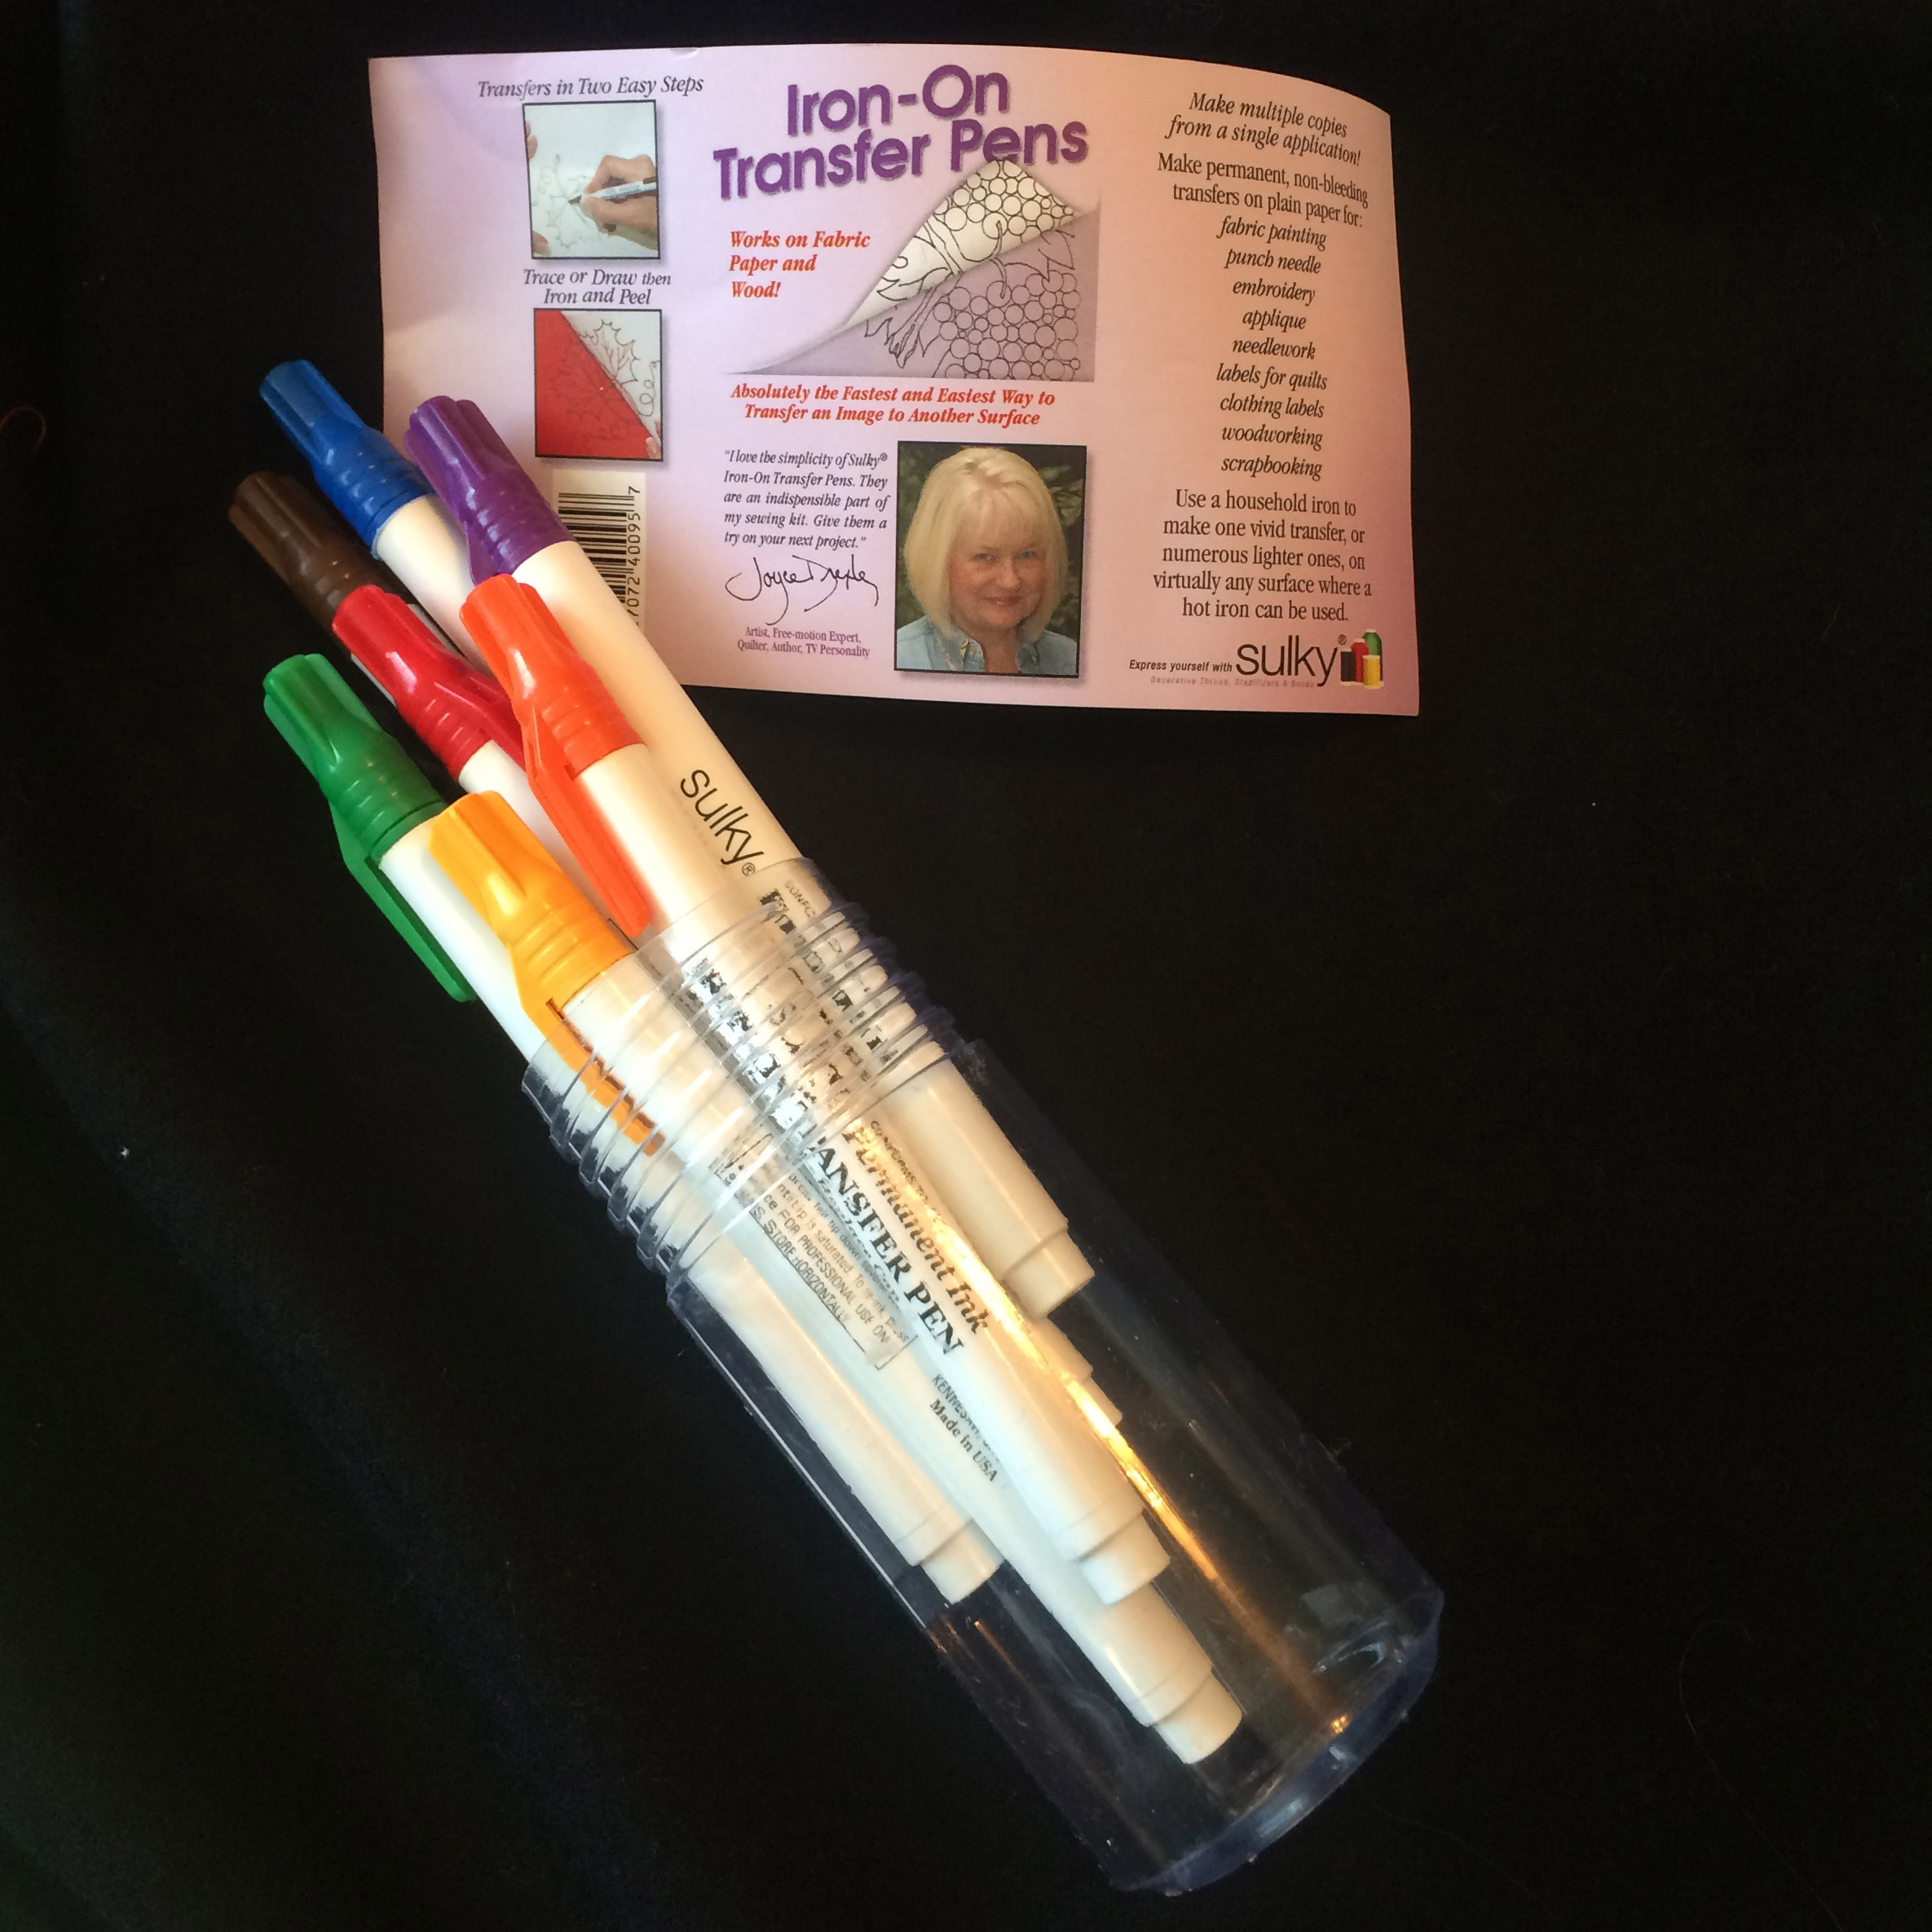
Sulky transfer marking pens
One of the last products I will talk about is the Sulky Iron On Tranfer Pens. These are a bit harder to find, and they actually serve a bit of a different purpose than outright marking pens/pencils. These pens make it possible to trace a design and then transfer that tracing to your wool – much like embroidery transfers. I have used these with fair success, but they do have their limitations. First of all when you transfer your design (this is done by pressing with an iron), you need to consider the color you are using. I found the tips of these pens to make a fairly ‘bulky’ line; so if I used a chain stitch it tended to cover the stitch quite well. (I used these pens when I made my Mandala Dreams models.) However, it can make a huge difference what thread color you are using. If you were to use the yellow pen on say – a brown or darker toned green, but then wanted to use a white thread for stitching, it is likely that the yellow colored line would show up from behind the white thread – given the ‘bulky’ sized line the pens make. Over all these pens work quite well, but there are a number of variables that need to be considered when using them. Plus it is hard to find the white color! One really neat thing about them though, is that once a design is traced, you can actually use it 1 or 2 times more (on just one tracing!)
These are the products that I have tried and found to fill most of my needs. Yes I am still waiting for the genius who can make a perfect fine line white marker(and or transfer marker) for wool! Be assured there are a lot of products out there that I have heard of people using. There are transfer papers, water soluble transfer papers, tracing on fine netting/mesh, etc. I can also recommend cutting shapes out of contact paper or wide pieces of painters tape and stitching around these shapes, etc. ‘Even length’ stitches and straight lines of stitches can be achieved with taped lines using quilting tapes (think tiger tape) and/or painters/dry cleaners tape as guides. Of course some of you are adventuresome and will simply draw freehand to accomplish your goal. I say ‘go for it!’ Check out what is available in your locale; if you are in a rural setting or cannot physically get out, the internet can be a resource. Experiment with different methods and see what you like and what works for you. There is no one right method, but there are methods that each and everyone of us will like! Happy stitching!
Added June 26, 2018
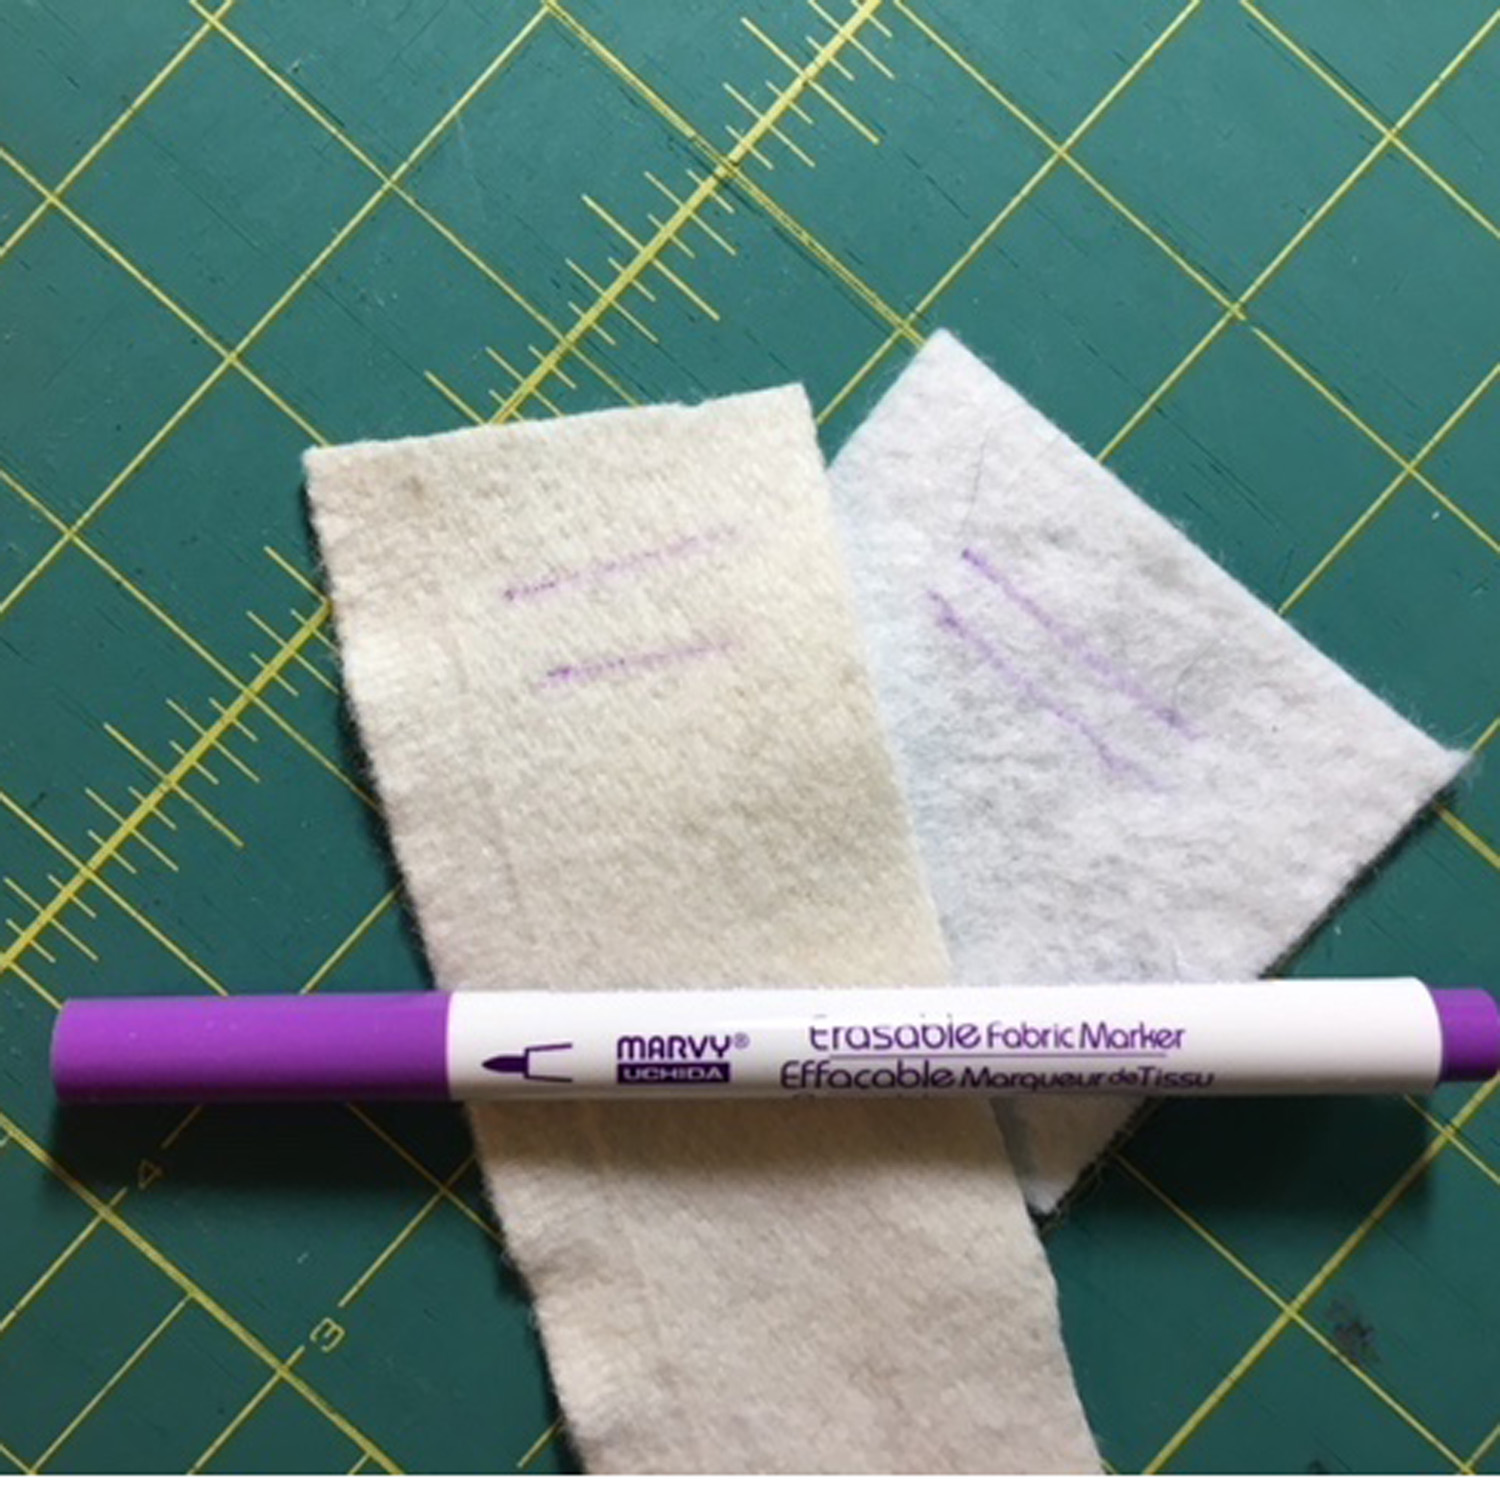 Just wanted to add my latest discovery in marking wool! This last year I ordered some longarm rulers and supplies from ‘Quilted Joy”, an APQS friendly online shop run by Angela Walters. Among the supplies I ordered was a marking pen for marking my quilts – the Marvy Erasable Fabric Marker. I was familiar with the Marvy brand name from past experiences with scrap booking pens, etc., but I had not seen this pen in any local shops. It is a fine tipped pen and it’s purple ink and will disappear in ‘2-10 days’ or can be spritzed with water to immediately erase. My experience was that it disappeared quite fast – fading even by the end of the day (when not moistened), although that time may have to do with just how saturated the marks are made. So yesterday, it suddenly dawned on me that I should try it on some wool and wool felt blends. Marked up some scraps and spritzed some water and wiped with a old cotton handkerchief – viola! – marks were totally gone and the wool wasn’t even totally soggy. Can I say I was a bit excited?! I have tried many other washable markers, but this is the best by far. And while it’s not a method for necessarily transferring a design in itself, it surely is helpful in marking placements, stitching lines, etc.
Here’s a photo of the pen and the marks made on both wool and a wool felt blend. So glad I can add this to my arsenal of ways of marking wool! As Mikey would say “Try it – you’ll like it!!!”
Mary this is the best review and guide I have read about marking on wool. Thanks for your kindness to share your experiences.
Thank you Peggy, for taking the time to check it out! But stay tuned – there are always new things coming up in the industry. Wish I were a scientist – whoever comes up with the ‘perfect’ wool marking pen will make a bundle! LOL! http://www.designandbemary.com/shop/wp-admin/edit-comments.php#comments-form
Thanks Mary. I have read of problems with ink coming through with Press N Seal, but that may have been with machine quilting. I hear about Frxion pens being used for marking and removed with heat, but I wonder about chemical residue appearing years later.
Hi Linda! I have not heard of ink coming through the Press N Seal – I’ve used a retractable Ultra Fine Sharpie for marking the Press N Seal and have not had a problem. I would be sure though that the ink has time to dry on the Press N Seal since it is more or less like putting ink on a slick rather non-absorbing surface as opposed to a paper type writing surface which is more absorbent. I’m not sure if machine quilting is any different – I would think there I would be more worried if the ink would ‘rub off’ onto the thread (presuming its a light colored thread). None the less, Sharpie ink is very permanent – with a DH who taught art for almost 40 years I saw more ruined clothes from Sharpie ink stains! LOL! I’m thinking maybe there are other inks out there that people have used and that while many are labeled permanent, in reality that quality may vary. I guess the best advice it to try small samples on your scrap pieces. I’ve heard a lot about the Frixion (sp?) pens and I must say that after reading various info about them, I have never felt compelled to try them. Maybe I’m really missing out?!! However, the one thing I read consistently is that the ink is affected by temperature – supposedly removed ink that ends up showing up again after exposure to colder temps (such as might happen if one was to ship a quilt from a warm temperature area to say, Minnesota or Wisconsin, in the middle of winter and it might sit in a delivery area or truck for some time. Surprise, open the quilt and there are all the marked lines once more! arghhhh!!) Even Frixion says that their pens have two separate inks that work in sync with each other and that combo somehow allows for this to happen. Theres lots of discussions when you google Frixion pens/quilting. I guess everyone has to use what best suits their purposes. Anyways, I have been a hand quilter for most of my quilting ‘career’ and I use the Fons and Porter fine marking pencils (SewLine also makes such pencils) and have never had a problem washing the pencil out. You can get a variety of colored leads for these pencils as well. I think you may be right to worry about chemical residue with various inks/dyes today. I try to keep my materials as simple as possible for creating those items that I feel might be around as my legacy!
Mary: Your review popped up on face book, and since I love to embroider, and am a newbie to wool. I would just like your opinion on whether to wash wool before using. Your help is greatly appreciated. And I am going to invest in some of the markers you reviewed.
Hi Vicki! Sorry this is a few days out – had some medical appt. days – and I think our health system thinks we have nothing better to do! LOL!! First of all thanks for checking my review, etc. When beginning you really do benefit from taking in all kinds of opinions and then trying them for yourself to determine what works for you. As someone who has made a living as an artist, you’ll always find that I try to encourage creativity – when you allow yourself to enjoy what you are doing, you’ll always feel ‘successful!’ My motto is learn as much as you can about your materials and the qualities they possess and then work with them ahowever you want! But, back to your question….I like to wash my wool and wool felt blends before using. I have very few exceptions to this ‘rule’. By washing the wool, you not only make sure it’s felted as you desire, but that any excess dye would become evident and you can resolve the issue before it becomes a problem in your project. I can’t imagine the disappointment in putting in many hours of stitching only to find a simple spill of a glass of water, etc. suddenly causes your wool project to bleed! And if you find that there’s a lot of dye, at least you have a chance to treat the wool with Retayne (a product that will set the dye). Now many of the hand dyed wools that are sold in smaller sized pieces in the quilt stores have already been washed and felted during the dye process. I’m talking about wool that is bought as yardage – or in clothing as many people have figured out that they can recycle wool clothing pieces. Do remember that if you buy yardage, you will need to consider shrinkage – and that can vary depending on the wool or wool felt blend. The only wool that I have not washed is some wool that I bought as a spectacular deal from the Pendleton Woolen Mill Outlet in Pendleton, Oregon. For some crazy reason it absolutely does not fray in the least – and this is right off the bolt. It is a coat weight wool and I actually tried washing a small piece to see if there was any difference and there was none! I’d say this was an isolated exception!! You may have to wash some wools longer, in hotter water and with more agitation to attain the degree of felting you prefer. They generally will ‘thicken’ a bit during this process. I know the National Non Woven wool felt blends (the label says not to wash!) generally thicken up and after I stem press and block the fabric back to shape, the felt has a most wonderful hand – not at all like the unwashed product! Of course wool felt (blends) will not withstand continual and repeated washings as there is no woven structure to keep the fibers together through such repetition. A soaking and once-in-a-very-while gently washing is appropriate. One other note here is that worsted wools are made with wool fibers that WILL NOT felt so avoid using worsted wool in your projects (I once purchased wool from the Pendleton outlet based on the employee’s description of it being regular wool – alas it was worsted wool-very nice wool, but worsted! arghhhh!! So as it was not returnable, I have found that I can use it as backing 1) after washing in really hot water and 2) using a fusible to make sure the edges don’t fray.). How do I wash my wool? I throw it in my very old top loading washer (like colors if washing more than one piece), use hot water and the gentle or regular cycle depending on how loosely the wool is woven. If one cycle doesn’t felt it enough, I do a second wash, etc. until it is felted to my liking. If there is a release of dye I throw in Color Catcher sheets until they are free of color. All wool is then dried in the machine dryer (again I have really old machines – my dryer is about 44 years old! – I don’t know how the newer washers and dryers work for this). Depending on the wool, once dried I may steam press with an iron but most often I just simply smooth and fold the wool for usage. I do find that really cheap, loosely woven wools do not felt particularly well. Trust me – you will gain experience as you touch and handle wool. I’m lucky as I have sewn most of my life and my mother taught me to feel and check the ‘hand’ of fabrics to determine quality – I didn’t appreciate that way back then, but sure am glad she taught me! To be honest most of the wools I have found or seen in quilt stores, etc. have been good quality; it’s the bolts (from some of the larger box stores that carry fabric for garment sewing) that tend to vary in quality due to the fact that they strive to keep their fabrics as inexpensive as possible.
I hope this long- winded answer 😉 is helpful to you. Feel free to follow my website/blog as well as DesignAndBeMary on YouTube. Enjoy the stitching!!
Thanks for the information on using wool. My friend has a wool press that is currently broken. I’ll tell him to get it repaired because he wants to make wool clothing.